
 Tel:
Tel:  Email:
  WhatsApp:
 Description
Key Technical Specifications
| Parameter | Specification | Notes |
|---|---|---|
| Input Voltage | 200V – 240V AC | 3-Phase (Standard Industrial) |
| Output Current | ~4.0A – 5.0A | Check specific motor rating plate |
| Applicable Motor | 0.75kW – 1.5kW | Depends on duty cycle (LD/ND) |
| Control Method | V/f Control, Vector Control | Sensorless vector available |
| Frequency Range | 0.5Hz – 400Hz | Programmable upper limit |
| Cooling | Forced Air (Internal Fan) | Ensure ventilation slots are clear |
| Protection | IP20 | Indoor use only, keep dust out |
| Communication | RS-485 (Option slot) | Modbus/CanOpen capable with card |
| Dimensions | Compact Chassis | DIN Rail or Screw mount |
Product Introduction
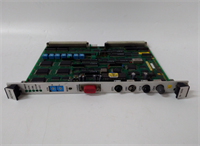
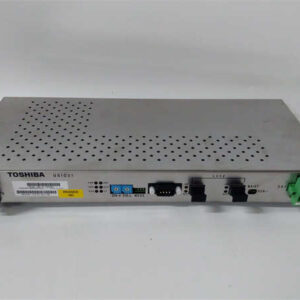
Toshiba drives have always been the “silent workhorses” of the factory floor—unflashy, but they just keep running. The DICW01G031 fits right into that lineage. You’ll typically find this unit tucked away in a control cabinet driving a conveyor belt, a small pump, or a packaging machine. It’s a 200V class inverter, which means it’s designed for standard industrial power, not the heavy-duty 480V stuff you see on massive crushers.What makes this specific model interesting is its balance of simplicity and capability. It supports sensorless vector control, which gives you enough torque at low speeds to start a loaded conveyor without needing a massive gear reduction. I’ve seen these units run for 15 years in environments that would kill a cheaper drive. However, since this is likely a replacement for an older system, pay close attention to the “G” in the model number—it often denotes a specific regional firmware or hardware revision. Don’t assume it’s pin-for-pin compatible with a brand new “VF-S15” off the shelf without checking the terminal block layout.
Quality SOP & Tech Pitfalls (The Reality Check)
The Lab Report (SOP)
We don’t trust 15-year-old capacitors blindly. Here is how we vet the DICW01G031:
- Visual Inspection: We look for “capacitor plague” (bulging tops) or discoloration on the PCB near the braking resistor terminals, which indicates previous overheating.
- Multimeter Check: We measure the DC bus resistance to ensure there are no shorted IGBTs.
- Soft Start Test: We apply power through a variac (variable transformer) first to charge the capacitors slowly. If it draws high current immediately, we scrap it.
- Run Test: We connect a test motor and run it through a speed ramp to verify the fan spins up and the output voltage is balanced across all three phases.
The Engineer’s Warning (Pitfalls)
Here is where this gets tricky.
- The “G” Variant Trap: Toshiba often used suffixes like “G” to denote specific OEM customizations or regional specs (e.g., different keypad connectors or logic input polarity). I once swapped a standard unit for a “G” variant, and the digital inputs wouldn’t trigger because the common was inverted. Always trace your control wiring before applying 24V.
- Capacitor Reforming: If this drive has been sitting on a shelf for two years, the electrolytic capacitors have likely degraded. Applying full power instantly can cause them to vent or explode. You must reform them by applying low voltage for an hour before full operation.
Installation & Configuration Guide
Phase 1: Pre-Installation
- Safety First: Lockout/Tagout the main breaker. Wait 10 minutes for the DC bus capacitors to discharge.
- Verify Voltage: Confirm your supply is 200-240V. Connecting this to 480V will destroy it instantly.
- Check Mounting: Ensure there is space above and below for airflow. These units breathe from the bottom.
Phase 2: Removal
- Label Wires: Tape and tag every wire (R, S, T, U, V, W, Control Terminals). Do not rely on memory.
- Remove DIN Rail Clip: Be careful not to snap the plastic retaining clip.
Phase 3: Installation
- Mount Unit: Slide onto the DIN rail or screw into the panel.
- Power Wiring: Connect R/L1, S/L2, T/L3 for input. Connect U/T1, V/T2, W/T3 to the motor.
- Grounding: Connect the ground terminal to the panel earth bar with a short, thick cable. Poor grounding causes noise faults.
Phase 4: Power-On & Testing
- Keypad Check: Ensure the remote potentiometer or control signals are wired correctly.
- Parameter Reset: Perform a parameter initialization to clear any old fault logs.
- Jog Test: Run the motor at 5Hz to check rotation direction.
Compatible Replacement Models
| Compatibility Tier | Model Number | Differences & Notes |
|---|---|---|
| ✅ Direct Replacement | VF-S15 (200V Class) | The modern successor. Pinout is generally compatible, but check terminal block spacing. |
| ⚠️ Software Compatible | VF-AS1 | Higher performance vector drive. Requires reprogramming of acceleration/deceleration times and V/F curves. |
| ❌ Hardware Mod Required | NC3 Series | Older legacy drive. Different mounting footprint and wiring; requires panel modification. |
Frequently Asked Questions (FAQ)
Q: Can I replace this with a generic brand like Delta or Schneider?
A: Physically? Maybe. Electrically? Yes, if you match the kW rating. But logically? No. The terminal logic (sink/source) might be different, and you’ll have to rewire your PLC outputs. Stick to Toshiba if you want a painless swap.Q: My drive shows “OC” and stops. What does that mean?
A: Overcurrent. Usually, this means the motor is jammed, or the acceleration time is set too fast (trying to spin up too quickly). Check the mechanical load first.Q: Is this drive single-phase input compatible?
A: Most 3-phase 200V drives can accept single-phase 200V input, but you must derate the output current (usually by 30-40%) because the rectifier diodes get hotter. Check the manual specifically for “Single Phase Operation.”Q: The keypad is dead. Can I still control it?
A: Yes. You can usually control it via the external terminal block (Run/Stop, Speed Potentiometer) even if the digital display is blank. If the display is dead, the drive might still be functional.Q: How do I reset the password if the parameters are locked?
A: Toshiba drives often have a parameter lock. You usually need to enter a specific code (often 0000 or a manufacturer default) into the password register to unlock it. If that fails, a full parameter initialization (reset to factory defaults) clears the lock but wipes your custom settings.