
 Tel:
Tel:  Email:
  WhatsApp:
 Description
Key Technical Specifications
| Parameter | Specification | Notes |
|---|---|---|
| System | 3300 XL 8mm | Industry standard for turbomachinery |
| Tip Diameter | 8 mm | Standard size for general purpose |
| Thread Size | 3/8-24 UNF | Imperial thread standard |
| Mounting Style | Reverse Mount | Threads are on the tip end |
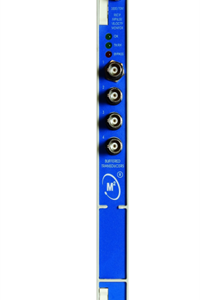
| Cable Length | 1.0 Meter (Option -10) | Integral cable length |
| Connector | Mini coaxial (Option -02) | Standard BNC-style locking |
| Sensitivity | 7.87 V/mm (200 mV/mil) | Match with 3300 XL前置器 |
| Temp Range | -35°C to +177°C | Standard probe limit |
| Compatibility | 330180 Proximitor | Requires matching system impedance |

Product Introduction
I’ve spent half my life crawling around turbine skids trying to get a probe into a gap that shouldn’t exist. That’s exactly why the Bently 330105-02-12-10-02-05 exists. It’s not just a sensor; it’s a workaround for mechanical designers who didn’t leave enough room for a standard probe body. This is a “Reverse Mount” probe—meaning the threads are at the very tip, allowing you to install it from behind a bracket or through a bulkhead where a bulky probe housing would never fit.The “3300 XL” designation means we are dealing with the 8mm system, which is the bread-and-butter of industrial vibration monitoring. The specific suffix breakdown here is critical: you’re getting a 3/8-24 thread (standard imperial), a 1.0-meter cable (which is short, usually for direct connection to a proximitor without extension cables), and the mini coax connector. If your machine shakes, this thing talks. But be warned—if you try to force this into a metric M10 hole, you will strip the casing. Check your bore diameter before you order.
Quality SOP & Tech Pitfalls (The Reality Check)
The Lab Report (SOP)
We don’t just pull these off the shelf and throw them in a box.
- Visual Inspection: We check the probe tip for scratches. Even a microscopic nick on the coil face ruins linearity. We also inspect the cable jacket for dry rot or cracks.
- Electrical Integrity: Using a Fluke multimeter, we verify coil resistance against the datasheet specs (typically around 6-8 ohms for the coil).
- Gap Voltage Test: We mount it on a test jig and run a “bump test” to ensure the output voltage swings linearly as the target moves.
- Insulation Check: Megger test to ensure there’s no short to the casing, especially important if the previous installation had oil leaks.
The Engineer’s Warning (Pitfalls)
Here is where people mess this up. The “Reverse Mount” design is tricky.
- The Gap Setting Trap: Because this mounts backwards, setting the gap voltage is counter-intuitive. You can’t just screw it in until it touches and back it off. You need a dial indicator or a specialized mounting fixture to set the -10V DC bias point accurately. I once watched a tech guess the gap; the machine tripped on high vibration two hours later because the probe was saturated.
- Cable Impedance: Do not mix and match cable lengths arbitrarily. The total system length (Probe + Extension + Proximitor) must equal exactly 5 meters or 9 meters (depending on the proximitor model). This unit has a 1.0m cable. If you use a 5m proximitor, you must use a 4m extension cable (like the 330130 series). If you mismatch the capacitance, your readings will drift, and your calibration will be garbage.
Installation & Configuration Guide
Phase 1: Pre-Installation
- Lockout/Tagout: Isolate the machine power.
- Verify Hardware: Ensure the mounting hole is drilled for 3/8-24 threads.
- Check Cabling: Confirm you have the correct extension cable (if needed) to match the 1.0m probe cable to your proximitor requirements.
Phase 2: Removal (If replacing)
- Label Wires: Mark the connector leads.
- Unlock Connector: Unscrew the locking ring on the mini coax connector carefully. Do not yank the cable.
- Unthread: Use a wrench on the hex flats, not the cable strain relief.
Phase 3: Installation
- Insert Probe: Thread the 330105 into the mounting hole. Tighten to spec (usually finger tight plus a quarter turn with a wrench—don’t crush the threads).
- Set Gap: Connect a digital voltmeter to the common and signal terminals. Slowly advance the probe until you hit the shaft (or reference surface), then back it off while watching the voltage. Stop exactly at the specified gap voltage (e.g., -10.0 VDC).
- Secure: Tighten the locknut (if applicable) or securing mechanism. Do not let the probe rotate while tightening, or you will lose your gap setting.
Phase 4: Power-On & Testing
- Verify Power: Check that the Proximitor (power supply) has -24V DC input.
- Check Output: Measure the DC bias voltage at the monitor input. It should match your gap setting.
- Bump Test: Manually move the shaft slightly (if possible) to see if the voltage fluctuates smoothly.
Compatible Replacement Models
| Compatibility Tier | Model Number | Differences & Notes |
|---|---|---|
| ✅ Drop-in Replacement | 330105-02-12-10-02-00 | Identical hardware. The last digit (-05 vs -00) often denotes packaging or minor revision; functionally interchangeable. |
| ⚠️ Cable Length Variant | 330105-02-12-05-02-05 | Same probe, but 0.5m cable. Requires different extension cable length to match system impedance. |
| ❌ Metric Conversion | 330103 Series | This is the Metric equivalent (M10x1 thread). Will not fit a 3/8-24 hole without re-drilling the casing. |
Frequently Asked Questions (FAQ)
Q: Can I use this with a standard 3500 rack?
A: Yes, but indirectly. This probe connects to a 330180 Proximitor (power supply/signal conditioner), which then plugs into the 3500 rack backplane or connects via terminal blocks. You cannot plug the probe directly into the rack.Q: My old probe has a different cable length. Does it matter?
A: It matters a lot. Bently systems rely on total cable capacitance. If your system is designed for 5 meters total, and this probe is 1 meter, you strictly need a 4-meter extension cable. If you use a 5-meter extension, you’ll have 6 meters total, and your sensitivity will be off, causing false alarms.Q: What does “Reverse Mount” actually mean?
A: It means the threads are on the front of the probe (the sensing end), not the back. You install it by screwing the nose into the hole, rather than putting the probe through the hole and nutting it from the back. It’s for tight spaces.Q: Is the -05 suffix significant?
A: Usually, the final suffixes indicate packaging (bulk vs. individual) or slight firmware/revision changes for the factory. For field replacement, -05 and -00 are generally treated as functionally identical unless your specific OEM manual says otherwise.Q: How do I know if the probe is damaged?
A: Check the DC resistance of the coil. If it reads infinite (open circuit) or zero (short circuit), the internal wire is broken. Also, inspect the tip epoxy; if it’s cracked or gouged, the electromagnetic field will be distorted.