
 Tel:
Tel:  Email:
  WhatsApp:
 Description
Key Technical Specifications
| Parameter Name | Detailed Value & Description |
|---|---|
| Part Number | 98.6.034.802 |
| Module Type | Input / Output (I/O) Interface Board |
| Application | Industrial Process Automation and Control Systems |
| Mounting Style | Standard Industrial Equipment Rack / Chassis Mount |
| Signal Processing | Digital or Analog signal conditioning (verify specific variant) |
| Operating Temperature | 0°C to 55°C (Standard industrial range) |
| Storage Temperature | -40°C to +70°C |
| Protection Rating | IP20 (Internal cabinet use only) |
| Power Supply | Supplied via backplane bus (Voltage varies by chassis) |
| Communication | Internal backplane data exchange |
Product Introduction
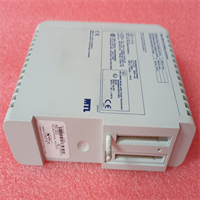
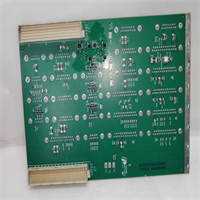
The Praxis 98.6.034.802 is a specialized Input/Output (I/O) module manufactured by Praxis Automation Technology, designed specifically for demanding industrial process control environments. This board serves as a critical interface within a larger PLC or Distributed Control System (DCS), translating raw field signals from sensors and switches into actionable data for the main controller. It is frequently found in marine, offshore, and heavy industrial automation applications where system reliability is paramount.From a maintenance perspective, this module is valued for its durable construction and straightforward rack integration. Sourcing exact replacements for legacy Praxis systems can be challenging, making verified new surplus stock incredibly valuable for keeping aging infrastructure online. The unit undergoes strict electrical isolation testing (>10 MΩ) to ensure it can handle industrial noise without corrupting sensitive control logic.
Installation & Configuration Guide
Phase 1: Preparation (10 min)
- Confirm the model number on the label matches your system’s hardware manual exactly.
- Ensure you have proper Electrostatic Discharge (ESD) protection, such as a wrist strap. These boards are highly sensitive to static shocks.
- Identify the correct slot in the chassis designated for this specific I/O address.
Phase 2: Removal of Old Unit (5–10 min)
- If the system is live, follow your plant’s hot-swap procedures strictly. Otherwise, power down the rack completely.
- Disconnect any external wiring harnesses attached to the front terminals. Take a clear photo of the wiring layout before unplugging anything—this will save you a major headache later.
- Release the locking mechanism (usually a lever or screws) and gently slide the faulty module out.
Phase 3: Installation (10 min)
- Carefully unpack the new 98.6.034.802 module, handling it only by the edges or metal faceplate.
- Align the module with the guide rails of the target slot. Push it firmly but evenly until the backplane connector seats fully.
- Secure the locking mechanism and reconnect the external field wiring according to your saved photos or schematics.
Phase 4: Power-On & Test (10 min)
- Restore power to the control rack. Watch for the module’s status LEDs to indicate normal operation (typically a solid green light).
- Use the system’s engineering software to verify that the controller recognizes the new hardware without throwing any “module missing” or “configuration mismatch” faults.
- Perform a loop check on the connected I/O points to confirm accurate signal transmission.
Troubleshooting Quick Reference
| Symptom | Probable Cause | Action |
|---|---|---|
| Module not detected | Improper seating or backplane issue | Power down and reseat the module firmly; check for bent pins on the backplane. |
| Fault LED illuminated | Hardware failure or configuration error | Check system logs for specific error codes; verify DIP switch settings match the old card. |
| Erratic signal readings | Loose wiring or grounding issues | Inspect terminal tightness; ensure the chassis has a solid earth ground connection. |
| System won’t power up | Short circuit in field wiring | Disconnect field wiring and try powering up again; isolate the short in the external loop. |
| Intermittent communication | Dirty contacts or loose slot | Clean the edge connectors with appropriate contact cleaner; try a different slot if available. |
Dimensions, Mounting & Wiring Notes
- Mounting Interface: Designed for standard industrial equipment racks (often proprietary Praxis chassis or compatible European card frames).
- Connections: Front-facing terminal blocks or pin headers depending on the specific sub-variant.
- Clearance: Ensure adequate airflow around the module faceplate. Do not block ventilation slots on the chassis.
- Wiring: Always use shielded cables for analog signals and terminate the shield at the cabinet ground bar to prevent electromagnetic interference (EMI).
FAQ
Q: Is this module compatible with other Praxis 98.x series cards?
A: Generally, yes. The 98.6.034.802 is part of the broader Praxis Automation family. However, always cross-reference the specific chassis manual, as some older backplanes may have firmware or voltage limitations with newer revision cards.Q: I’m worried about installing this myself. Is it difficult?
A: If you’ve worked with standard rack-mounted PLCs (like Allen-Bradley or Siemens) before, this is very similar. The hardest part is usually just getting the wiring diagram right. Just remember to take that picture of the old wiring before you disconnect anything!Q: What is the lead time for this part?
A: We currently hold new surplus stock of the 98.6.034.802 ready for immediate dispatch. Since these are becoming harder to find, we recommend securing spares now if your system relies heavily on them.Q: Does this come with a warranty?
A: Yes. All our new surplus modules come with a standard functional warranty. They undergo rigorous incoming inspection and power-up testing to ensure they meet original factory specifications before shipping.Q: Can I use this in a high-vibration environment like a ship engine room?
A: Praxis modules are built for marine and heavy industrial use, so they are designed to withstand significant vibration. Just ensure the retaining screws or locking levers are tightly secured in the rack to prevent the card from walking out over time.