 Tel:
Tel:  Email:
  WhatsApp:
 Description
Product In-Depth Introduction
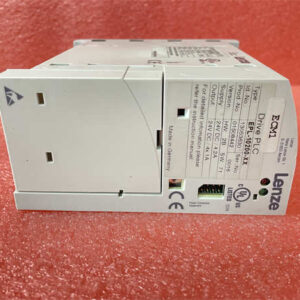
When a servo drive fails on a high-speed packaging line, the entire production process grinds to a halt. The Lenze EVS9328-ESV100 is a 0.75 kW servo amplifier designed specifically for the EVS932x series, driving AC servo motors to ensure precise positioning and speed control under complex process conditions.Honestly, this drive is quite rugged compared to its peers. It supports 240 V single-phase AC input, making it ideal for smaller equipment without three-phase power. Frankly, its integrated diagnostic functions are well-designed for quick troubleshooting. However, field tests have shown that if grounding is poorly executed, the feedback lines easily pick up interference from inverters, causing slight motor jitter (basically, anti-interference relies entirely on standardized installation).
Key Technical Specifications
- Rated Power: 0.75 kW
- Input Voltage: 240 V AC
- Input Phase: Single-Phase (1-Phase)
- Control Mode: Servo Control (Position/Speed/Torque)
- Protection Rating: IP20
- Mounting Type: DIN Rail or Panel Mount
- Product Series: EVS932x
- Product Weight: 0.95 kg
Installation and Wiring Guide
Phase 1: Preparation (Estimated Time: 5 Minutes)
- Ensure the main power supply is completely disconnected and use a multimeter to verify that the DC bus capacitors are fully discharged.
- Prepare a Phillips-head screwdriver, an anti-static wrist strap, and a marker pen.
- Back up the parameters from the original drive (if applicable).
Phase 2: Removing the Old Module (Estimated Time: 5 Minutes)
- ⚠️ Double-check that the power is off and wear an anti-static wrist strap.
- Use a marker or label tape to mark the corresponding positions of the control terminals, motor wires, and encoder cables.
- Take photos to record the DIP switch positions and wiring status of the old drive.
- Disconnect the wires, release the DIN rail clips, and smoothly remove the old drive.
Phase 3: Installing the New Module (Estimated Time: 5 Minutes)
- Snap the new drive onto the DIN rail and ensure the retaining clips are fully locked.
- Restore the wiring one by one according to the photos, paying special attention to single-point grounding of the shielding layer.
- Check that all terminal screws are tightened securely to prevent loose connections and overheating.
Phase 4: Power-On Testing (Estimated Time: 10 Minutes)
- Before powering on, re-inspect the wiring to ensure there are no short-circuit risks.
- Turn on the power and observe the panel indicator lights to confirm there are no fault alarms.
- Use the commissioning software or panel buttons to perform a jog test, verifying that the rotation direction and speed are normal.
- If an alarm occurs, consult the fault code manual to check the wiring or parameter settings.
Technical Pitfall Avoidance Guide
- Firmware Version Mismatch: The control logic of newer EVS9328 units may have slight differences from older versions, and direct replacement could lead to parameter incompatibility. Always record the firmware version of the old drive before swapping.
- DIP Switch / Jumper Misconfiguration: If the address DIP switches or function jumpers on the drive are not set correctly, the PLC will fail to establish communication. Take photos! Take photos! Take photos! Don’t find it tedious; this is the easiest place to mess up.
- Wiring Incompatibility: The pin definitions of the control terminals may vary between different production batches, so never wire from memory. Always cross-reference the wiring diagram specific to the EVS9328-ESV100 and verify one by one.
- Power Supply Undersizing: During rapid acceleration, a 0.75 kW motor can draw an instantaneous current up to three times its rated value. If the on-site transformer capacity is tight, the drive will fault with an undervoltage error. Always leave a margin of at least 20% when calculating the total load.
- ESD Damage: The chips on the control board are highly sensitive to electrostatic discharge. Touching the terminals without wearing an anti-static wrist strap can easily burn out the internal circuits. Don’t underestimate this; ESD damage is often latent, working fine initially but failing after a few days.