 Tel:
Tel:  Email:
  WhatsApp:
 Description
Key Technical Specifications
| Parameter | Specification | Notes |
|---|---|---|
| Nominal Voltage | 24.0 VDC | Standard industrial control voltage |
| Max Rated Voltage | 28.6 VDC | Do not exceed this limit |
| Contact Input Max | 32 VDC | Absolute maximum rating |
| Operating Temp | -30°C to +65°C | Wide range for harsh environments |
| Storage Temp | -25°C to +70°C | Keep in climate-controlled storage |
| Certification | UL, cUL | Class I, Div 2 (Hazardous Locations) |
| Communication | I/O Ethernet | Redundant ports for reliability |
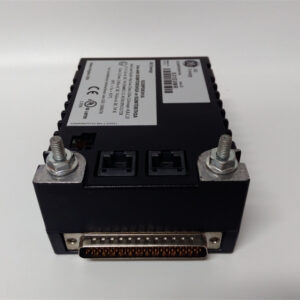
| Connector Type | DC-37 Pin | Mates with terminal boards (e.g., TRLY) |
| Dimensions | Approx. 127mm x 76mm | Standard Mark VIe pack size |
| Weight | ~0.6 lbs (0.27 kg) | Lightweight metal enclosure |
Product Introduction
Let’s be honest: in a gas turbine control cabinet, heat is the enemy. Most standard PLC output cards start acting flaky once the ambient temperature climbs past 50°C, but the GE Mark VIe system was built specifically for these brutal conditions. The IS220PDOAH1B is the workhorse of that lineup. It’s a Discrete Output I/O Pack designed to take digital commands from the processor and physically switch external loads—like lube oil pumps, alarm horns, or trip solenoids.What makes this specific revision (the “B” suffix) a solid choice is its ruggedization. It’s rated for hazardous locations (Class I, Division 2), meaning if you have a gas leak in the compressor building, this module won’t be the ignition source. It handles a nominal 24VDC supply but can tolerate spikes up to 32VDC without frying the internal logic. I’ve seen these run for a decade in cabinets that bake in the Texas sun, provided the cooling fans are doing their job. It connects via redundant I/O Ethernet, so if one network cable gets chewed or severed, the controller keeps talking to it.
Quality SOP & Tech Pitfalls (The Reality Check)
The Lab Report (SOP)
Before we ship this out, we don’t just look at the box. We treat it like a flight-critical component.
- Visual Inspection: We check the DC-37 connector pins for any bending or corrosion. These pins are fragile; if they’re bent, the module won’t seat on the terminal board.
- ESD Verification: We verify the unit was stored in anti-static packaging. Static damage is invisible but fatal.
- Live Test (Simulated): We rack it up on a test bench with a compatible terminal board simulator. We toggle the outputs and verify the LED status changes match the software command.
- Firmware Check: We log the firmware version to ensure it matches your system revision.
The Engineer’s Warning (Pitfalls)
Here is where guys get burned. The IS220PDOAH1B relies heavily on the terminal board it’s plugged into (usually an IS200TRLY series).
- The “Wetting” Voltage Trap: If you are using this to drive low-current sensors rather than relays, you need to understand “wetting current.” This module puts out a small contact wetting voltage (around 31 VDC) to keep contacts clean. If your downstream device isn’t expecting this, you’ll get ghost readings or chatter.
- Field Disaster Story: I once saw a technician replace a bad PDOA pack but forgot to set the jumper settings on the new board to match the old one. He assumed it was plug-and-play. It wasn’t. The module powered up, but the output logic was inverted. He spent six hours troubleshooting wiring before realizing the configuration jumpers were still in the factory default position. Always copy the jumper settings first.
Installation & Configuration Guide
This isn’t rocket science, but rushing it will cost you downtime. Follow this drill.
- Pre-Installation Safety
- ⚠️ Lockout/Tagout: Ensure the 24VDC control power is disconnected. Even though it’s low voltage, a short circuit here can weld the terminals.
- Photo Documentation: Take a high-res photo of the existing module’s faceplate and side labels. Specifically, look for any handwritten tags regarding “Trip” or “Alarm” assignments.
- Removal
- Disconnect the I/O Ethernet cables (RJ45). Label them “Port 1” and “Port 2” if they aren’t already marked.
- Unscrew the mounting screws (if applicable) or release the DIN rail clip.
- Pull the module straight back off the terminal board. Don’t wiggle it side-to-side; you’ll damage the mating connector.
- Installation
- Jumper Check: Before installing, compare the new IS220PDOAH1B against the old one. Are the shunts/jumpers in the exact same spots? If not, move them now.
- Seat the module onto the terminal board firmly. You should feel it lock into place.
- Reconnect the Ethernet cables.
- Power-On & Testing
- Restore 24VDC power. Watch the LEDs. You should see a boot sequence (flashing lights).
- Open your toolboxST software. Verify the module appears in the hardware tree with no “Comm Loss” alarms.
- Force a single output ON from the software to confirm the physical relay clicks.
Compatible Replacement Models
| Compatibility | Model Number | Notes |
|---|---|---|
| ✅ Drop-in Replacement | IS220PDOAH1A | The “A” revision. Functionally identical for most applications. Check firmware compatibility. |
| ✅ Direct Successor | IS220PDOAH1C | Newer revision. Usually backwards compatible, but verify the datasheet for minor electrical tweaks. |
| ⚠️ Software Compatible | IS220PDIOH1A | This is a Combined Input/Output pack. It does more than the PDOA. You can use it to replace a PDOA, but you’re paying for inputs you won’t use. Requires logic recompile. |
| ❌ Not Compatible | IS200PDOAG1A | This is a Mark VI (non-e) part. Different architecture. It will not fit or work in a Mark VIe rack. |
Frequently Asked Questions (FAQ)
Q: Can I hot-swap this module while the turbine is running?
Technically, yes, the Mark VIe system supports online replacement of I/O packs. However, I wouldn’t recommend it unless it’s an emergency. Pulling a card creates a momentary open circuit on the backplane which can induce noise. If you must do it, ensure the outputs controlled by this card are in a safe state (e.g., turbine at rest) or force the logic to ignore the missing card temporarily.Q: My new module has different LEDs than the old one. Is this wrong?
Not necessarily. GE updates the hardware revisions constantly. As long as the part number (IS220PDOAH1B) matches and the firmware version is compatible with your main processor (UCIA/UCIB), the LED arrangement might vary slightly between sub-revisions. Check the manual GEH-6725 for the specific LED patterns.Q: Does this come with the terminal board?
No. This is just the “Pack” (the module). It plugs into a separate Terminal Board (like the IS200TRLYS1B). You need to buy that separately if your base is also damaged.Q: What does the “B” in the part number mean?
It indicates the revision level. “B” is generally better than “A” as it fixes early silicon bugs. You can mix A and B packs in the same rack, but try to keep them consistent to avoid confusion during spare parts inventory.Q: It’s throwing an “Undervoltage” alarm. What gives?
Check your 24VDC supply at the terminal board. If the voltage drops below roughly 18-20VDC, this module will fault out to protect the logic. It could be a failing power supply or a loose connection on the input terminal block.