 Tel:
Tel:  Email:
  WhatsApp:
 Description
Key Technical Specifications
| Parameter | Specification |
|---|---|
| Slot Count | 18 Slots (1 CPU + 17 I/O) |
| Bus Current | 2.0 Amps (Total system limit) |
| Mounting | DIN Rail or Panel Mount |
| Physical Size | 18.50 in (W) x 10.50 in (H) |
| Backplane Power | 5V DC (Logic) |
| Field Power | 24V DC (External supply required) |
| Compatible CPUs | RX7i (IC698CPE…) |
| Compatible I/O | VersaMax Series |
| Weight | Approx. 4.5 kg (Empty) |
| Part Status | Active / Supported |
Product Introduction
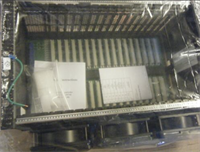
The IC698CHS117C is an 18-slot rack assembly designed for the GE Fanuc PACSystems RX7i and VersaMax platforms. It serves as the physical backbone for automation systems requiring extensive I/O density, housing the CPU and up to 17 communication or I/O modules in a single chassis.Unlike smaller 9-slot versions, this unit maximizes expansion capability without requiring remote drops. It supports a total bus current of 2 Amps. This allows for mixed configurations of high-power modules, provided the aggregate load remains within the backplane rating. The chassis features a rigid metal construction with integrated DIN rail clips for industrial mounting.
Installation & Configuration Guide
Phase 1: Preparation (10 min)
- Power Down: Ensure main control power is disconnected. Lockout/Tagout (LOTO) the enclosure.
- Verify Parts: Confirm you have the IC698CHS117C, the correct CPU module, and necessary I/O cards.
- Tools: You will need a Phillips #2 screwdriver and a flathead screwdriver for terminal blocks.
Phase 2: Removal (5–10 min)
- Label Cables: Mark all field wiring and communication cables connected to the old rack.
- Disconnect: Unplug the 24V DC power connector and ribbon cables (if daisy-chained).
- Unlatch: Release the DIN rail locking tabs at the bottom of the chassis.
- Extract: Pull the rack away from the rail.
Phase 3: Installation (10 min)
- Mounting: Hook the top of the IC698CHS117C onto the DIN rail or align with panel holes.
- Secure: Snap the bottom locking tabs onto the rail. Tighten panel screws to 1.5 Nm if panel mounting.
- Module Insertion:
- Insert the CPU into Slot 1 (far left).
- Fill remaining slots with I/O modules from left to right.
- Note: Ensure modules are fully seated; you should hear a distinct click or feel firm resistance.
- Bus Expansion: If using a second rack, connect the bus expansion cable (IC698CBLxxx) between the transmitter and receiver modules.
Phase 4: Power-On & Test (10 min)
- Check Jumpers: Verify voltage selector jumpers on power supplies (if applicable).
- Apply Power: Connect 24V DC to the power entry module.
- LED Check:
- PWR LED: Should be solid Green.
- CPU LED: Should toggle or show Run status.
- Fault LED: If Red, check module seating.
- Software Handshake: Connect via Proficy Machine Edition to verify hardware configuration matches the physical rack.
Troubleshooting Quick Reference
| Symptom | Probable Cause | Corrective Action |
|---|---|---|
| No LEDs lit | Missing 24V DC input | Verify external power supply is on and connected to the power entry module. |
| CPU Fault LED (Red) | Bad backplane connection | Reseat the CPU module. Clean contacts with isopropyl alcohol if dirty. |
| I/O Module Not Reading | Bus current overload | Calculate total current draw. If >2A, remove modules or add a second rack. |
| Random Comm Errors | Loose Bus Cable | Reseat the expansion cable at both ends. Check for bent pins. |
| Slot X Not Working | Physical damage | Inspect the backplane connector for bent pins. Replace rack if damaged. |
IC698CHS117C GE
Dimensions, Mounting & Wiring Notes
- Dimensions: 470 mm (W) x 267 mm (H) x 130 mm (D).
- Mounting: The unit is designed primarily for standard 35mm DIN rails. It can also be panel mounted using the four corner keyholes.
- Wiring: The backplane distributes 5V DC logic power. You must provide a separate 24V DC field power supply for the I/O modules to drive outputs. Do not backfeed power through the I/O terminals.
FAQ
Can I mix VersaMax and RX7i modules in this rack?
Yes. The IC698CHS117C supports both VersaMax I/O and RX7i specialty modules. The CPU determines the primary system logic, but the backplane bus is compatible with both form factors.What does the “C” in IC698CHS117C stand for?
It indicates the revision level of the hardware. Revision C units generally have updated circuitry compared to A or B versions. Always check the firmware compatibility with your CPU.I’m getting a “Bus Overcurrent” fault. What gives?
You are likely drawing more than 2 Amps from the backplane. High-density digital output modules draw significant current. Calculate the mA draw for every module; if it exceeds 2000 mA, you need to offload some I/O to a remote drop or a second rack.Is this item new or refurbished?
We supply both New Surplus (original packaging) and Refurbished (tested) units. Check the specific listing condition for details on cosmetic wear.Does this rack come with a power supply?
No. The IC698CHS117C is just the chassis (backplane). You must purchase a compatible power supply module (e.g., IC698PSA100 or IC698PSA350) and install it into the rack.