 Tel:
Tel:  Email:
  WhatsApp:
 Description
Product Deep Introduction
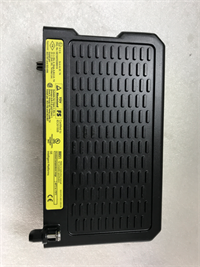
The GE IC200CPUE05 is a compact, high-performance CPU module belonging to the VersaMax series, specifically engineered for small to medium-sized industrial automation control systems. As the “brain” of the PLC rack, it integrates powerful computing capabilities, versatile storage, and robust multi-protocol communication into a single unit.What sets the IC200CPUE05 apart from standard CPUs is its exceptional connectivity. It features a built-in 10Mbps Ethernet port alongside dual serial ports (RS-232 and RS-485), making it incredibly flexible for networking with HMIs, host computers, and other PLCs. With a typical boolean execution speed of 0.8ms/K and support for floating-point math, it easily handles complex logic and closed-loop PID control tasks. It is widely used in packaging machinery, material handling, HVAC systems, and small-scale process control applications.
Key Technical Specifications
- Brand: GE (General Electric / GE Fanuc)
- Model: IC200CPUE05
- Applicable Series: VersaMax
- Processor: High-performance 32-bit processor
- Memory: 64KB user-configurable program/data memory (some versions support 128KB)
- Execution Speed: 0.8ms/K (typical for boolean logic)
- I/O Expansion: Supports up to 64 modules or 2048 I/O points in an expanded system
- Communication Ports:
- 1x Ethernet (RJ45, 10Mbps, supports SRTP, EGD, Modbus TCP)
- 1x RS-232 (9-pin, for programming/HMI)
- 1x RS-485 (15-pin, supports Modbus RTU)
- Real-Time Clock (RTC): Battery-backed, accuracy ±9 seconds/day
- Power Backup: Supercapacitor maintains data for 1 hour; optional battery extends to 6 months
- Mounting: DIN Rail (Horizontal or Vertical)
Installation & Commissioning Guide
Phase 1: Preparation (Estimated Time: 10 minutes)
- Safety First: Ensure the main 24VDC power supply to the VersaMax rack is completely disconnected. Apply Lockout/Tagout (LOTO) procedures.
- Tools Required: Anti-static wrist strap, appropriate screwdrivers, and a laptop with Proficy Machine Edition software installed.
- Documentation: Have the VersaMax hardware installation manual and your system’s I/O configuration diagram ready.
Phase 2: Module Installation (Estimated Time: 15 minutes)
- ESD Protection: Wear an anti-static wrist strap before removing the IC200CPUE05 from its packaging to prevent static damage.
- Visual Inspection: Check the module for any physical damage and verify the model number and firmware version on the label.
- Mounting: Snap the CPU module onto the standard DIN rail or align it with the VersaMax carrier. Slide it firmly into place until it locks securely against the backplane.
- Securing: Ensure the module is properly seated. If using a carrier, verify the locking mechanism is engaged.
Phase 3: Wiring & Connection (Estimated Time: 20 minutes)
- Power Wiring: Connect the external 24VDC power supply to the CPU’s power terminals, ensuring correct polarity (+ to +, – to -).
- Communication Wiring:
- Use a standard Ethernet cable to connect the RJ45 port to your local network or HMI.
- If using serial communication, connect your programming cable to the RS-232 (Port 1) or field devices to the RS-485 (Port 2).
- Grounding: Ensure the DIN rail and the module are properly grounded to minimize electrical noise.
Phase 4: Power-up & Commissioning (Estimated Time: 30 minutes)
- Pre-power Check: Double-check all wiring, especially the 24VDC input polarity.
- Power On: Restore the 24VDC power. Observe the LED indicators on the front of the CPU. A solid green “PWR” and “OK” LED indicates the module is powered and functioning normally.
- Software Connection: Open Proficy Machine Edition, create or download your hardware configuration, and establish communication with the CPU via Ethernet or Serial.
- System Verification: Verify that the CPU recognizes all installed I/O modules in the rack and that there are no “Hardware Fault” or “I/O Fault” errors in the diagnostic buffer.