 Tel:
Tel:  Email:
  WhatsApp:
 Description
Key Technical Specifications
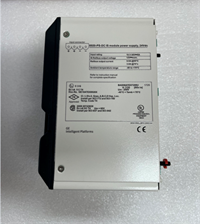
- Part Number: DS2020PDMAG6
- Product Type: Power Distribution Module (PDM)
- System Compatibility: GE Speedtronic Mark V / Mark VI
- Input Voltage: 115V AC or 230V AC (Selectable via transformer cable)
- Output Voltage: 125V DC
- EMI Protection: Integrated Control Power Filter (CPF) with Corcom 30A modules
- Application: Gas Turbine Control Management Systems
- Mounting: DIN Rail / VME Rack compatible
- Diagnostic Feature: Collects and links diagnostic data via J301
- Country of Origin: USA
Product Introduction
The GE DS2020PDMAG6 is a critical Power Distribution Module (PDM) engineered for the Speedtronic Mark V and Mark VI gas turbine control systems. Its primary job is to take incoming facility power and cleanly distribute 125V DC and 115/230V AC to all associated racks, terminal boards, and I/O core components.What sets this module apart is its built-in power conditioning. It houses Control Power Filters (CPF) that drastically reduce EMI noise, ensuring the sensitive turbine control boards receive a clean, stable power supply. In the field, this means fewer nuisance trips and less signal interference on your analog I/O readings.
Installation & Configuration Guide
Phase 1: Preparation (10 min)
- Power Down: Verify that all incoming 115/230V AC and 125V DC facility power sources are locked out and tagged out.
- ESD Safety: Put on a grounded wrist strap. Turbine control boards are highly sensitive to static discharge.
- Verify Voltage: Check your facility’s incoming AC voltage. You need to know if you are supplying 115V or 230V before wiring.
Phase 2: Removal (If replacing a faulty PDM) (10-15 min)
- Document Wiring: Take clear photos of the existing J17-J20 AC feed wiring and the DC connections.
- Disconnect: Unplug the AC power cables and the DC distribution cables from the terminal blocks.
- Unmount: Release the module from the DIN rail or VME rack and carefully slide it out.
Phase 3: Installation (15 min)
- Voltage Selection: This is critical. Ensure the transformer cable is plugged into JTX1 for 115V AC operation or JTX2 for 230V AC operation. Plugging it into the wrong jack can damage the internal AC/DC converter.
- Mounting: Secure the DS2020PDMAG6 onto the DIN rail or into the rack slot.
- Wiring: Connect the fused AC feed wires to terminals J17-J20. Connect the 125V DC output cables to the VME rack and terminal boards.
Phase 4: Power-On & Test (10 min)
- Visual Check: Double-check that all terminal screws are tight and no loose wire strands are present.
- Power Up: Restore the incoming AC power.
- LED/Diagnostic Check: Observe the module’s status LEDs. Verify that the diagnostic data is successfully linking to the VCMI in Rack “R” via the J301 cable.
Troubleshooting Quick Reference
| Symptom | Probable Cause | Quick Fix |
|---|---|---|
| No DC Output | Wrong transformer cable jack | Check if the cable is in JTX1 (for 115V) or JTX2 (for 230V). |
| Noisy Power Signal | Missing or loose CPF module | Ensure the Corcom 30A filter modules are seated firmly in the CPF rack. |
| Blown Fuses | Short circuit in downstream wiring | Check the fused 125V DC feed lines to the I/O cabinets for shorts. |
| Diagnostic Fault | J301 cable disconnected | Verify the cable running from the PDM to the VCMI (Rack “R”) is secure. |
| Unstable Voltage | Bad AC/DC converter | Measure the output of the AC/DC converter; replace if out of tolerance. |
Dimensions, Mounting & Wiring Notes
- Mounting: Designed for standard DIN Rail mounting or integration into a VME rack chassis.
- AC Input Terminals: J17, J18, J19, J20 (Fused and wired for AC feeds).
- Voltage Select Jacks: JTX1 (115V AC) and JTX2 (230V AC).
- Diagnostic Port: J301 (Connects to VCMI for data linking).
- Wiring Note: The module creates a redundant power supply by looping the de-voltage cable back to the main DC source and diode. Ensure this loop is wired exactly as per the OEM schematic to maintain redundancy.
FAQ
Q: Can I use the DS2020PDMAG6 in a Mark VI system?
A: Yes. While it is a core component of the Mark V series, this PDM is explicitly designed to provide power distribution for Mark VI systems as well, supplying the necessary 125V DC and AC voltages.Q: My facility uses 230V AC. How do I configure this module?
A: It is plug-and-play. You simply need to ensure the transformer cable is inserted into the JTX2 jack. If you were running 115V, you would use JTX1. Getting this wrong is the most common installation error.Q: What does the “CPF” mentioned in the specs stand for?
A: CPF stands for Control Power Filter. This module includes a chassis (CPF rack) that holds Corcom 30A filter modules. Their job is to strip out EMI (electromagnetic interference) noise from the incoming power so your turbine control boards don’t glitch.Q: Is this a refurbished board or a new original part?
A: This is a New Surplus, Original OEM unit. It was sourced through authentic OEM or independent third-party channels and has passed strict quality control verification. It is not a field-used repair.Q: I’m replacing an old PDM. Do I need to reconfigure any jumpers?
A: Generally, no. The main “configuration” is the physical transformer cable (JTX1 vs JTX2) for your voltage. However, always take a photo of your old board’s wiring and jumper settings before you disconnect anything, just to be safe.Q: What happens if the diagnostic cable (J301) isn’t connected?
A: The power distribution will still work fine, but the system won’t be able to collect or display diagnostic data from the PDM on the operator interface. You’ll essentially be flying blind regarding the health of your power supply.