 Tel:
Tel:  Email:
  WhatsApp:
 Description
Key Technical Specifications
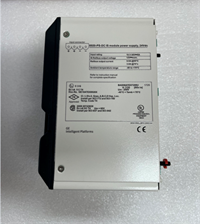
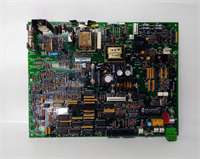
- Product Type: Power Distribution Board / PCB
- Application System: GE Mark V / Mark VI Turbine Control Systems
- Hardware Interface: 8 toggle/DIP switches, 1x 10-pin connector
- Circuit Protection: 36 onboard fuses with corresponding OK LEDs
- Signal Terminals: 4 signal wire terminals (IDs: AC1N, AC1H, AC2N, AC2H)
- Primary Function: Distributes control-level power and protects circuits from overloads
- Operating Temperature: Industrial grade (approx. 40-70°C, verify with OEM datasheet)
- Mounting Type: DIN rail or panel mount (depending on chassis configuration)
Product Introduction
The GE DS200TCPDG2BEC is a specialized power distribution board engineered for General Electric’s Mark V and Mark VI turbine control systems. Its primary role is to manage power allocation within the control cabinet and provide essential circuit protection to prevent hardware damage from electrical overloads.Field technicians value this board for its straightforward maintenance design. It features 36 individual fuses paired with OK LEDs, allowing for rapid visual fault isolation without needing complex diagnostic tools. The board also includes 8 configurable DIP switches to adapt to various system wiring requirements.
Installation & Configuration Guide
Preparation (10 min)
- Verify the part number (DS200TCPDG2BEC) matches your system requirements.
- Gather a flat-head screwdriver for terminal wiring and anti-static wrist strap.
- Ensure the turbine control system power is completely locked out and tagged out (LOTO).
Removal of Old Board (5-10 min)
- Locate the signal wire terminals on the existing board. Note the terminal IDs: AC1N, AC1H, AC2N, and AC2H.
- Critical Step: Label every single wire with the ID of the terminal it is connected to. Use durable labels that won’t fall off.
- Loosen the terminal screws and carefully disconnect all signal wires.
Installation (10 min)
- Mount the new DS200TCPDG2BEC board into the designated slot or DIN rail.
- Insert the labeled wires into the matching terminal IDs on the new board.
- Tighten the terminal screws securely. Give each wire a gentle tug to ensure it is firmly seated.
Power-On & Test (10 min)
- Double-check that all 36 fuses are properly seated in their clips.
- Restore system power. The onboard OK LEDs should illuminate, indicating healthy circuits.
- Verify that the DIP switch settings match the configuration of the replaced board (if applicable).
Troubleshooting Quick Reference
| Issue | Probable Cause | Quick Fix / Check |
|---|---|---|
| OK LED is Off | Blown Fuse | Locate the corresponding fuse among the 36 onboard and replace it. |
| No Power Output | Loose Signal Wiring | Check terminal screws at AC1N, AC1H, AC2N, AC2H for tight connections. |
| System Fault Alarm | Incorrect DIP Switch | Compare the 8 switch positions against the system wiring diagram. |
| Intermittent Signal | Poor Terminal Contact | Re-seat the wires and ensure no copper strands are frayed or loose. |
| Board Overheating | Short Circuit Downstream | Check the external load and wiring for shorts before replacing fuses. |
Dimensions, Mounting & Wiring Notes
- Mounting Method: Typically installed within a GE Mark V/VI control cabinet rack or on a standard DIN rail.
- Physical Characteristics: Industrial PCB housed in a protective metal frame for grounding and EMI shielding.
- Terminal Notes: Uses screw-type terminals. The four main signal terminals are clearly marked with IDs (AC1N, AC1H, AC2N, AC2H) to prevent wiring errors during replacement.
- Fuse Type: Uses standard 2AG fuses (e.g., 7A for power outputs, 1/2A for AC outputs). Always replace with the exact amperage rating.
FAQ
Q: Is this board compatible with both Mark V and Mark VI systems?
A: Yes, the DS200TCPDG2BEC is widely used in both GE Mark V and Mark VI turbine control series. However, always cross-reference your specific turbine control manual to ensure it matches your chassis generation.Q: I’m replacing a faulty board. Do I need to reconfigure the switches?
A: Generally, no. If you labeled your wires and took a photo of the old board’s DIP switch positions before removal, simply replicate those settings on the new board. The system expects the same hardware configuration.Q: What do the 36 LEDs on the board indicate?
A: Each of the 36 “OK” LEDs corresponds to one of the 36 fuses on the board. If an LED is lit, the fuse is intact. If an LED is off, that specific fuse has blown and needs replacement.Q: Is this item tested before shipping?
A: Yes. All units undergo a visual inspection and a power-on self-test to verify that the LEDs function and there are no obvious short circuits. We also document the firmware/hardware revision if applicable.Q: I don’t have the original wiring diagram. How do I know where the wires go?
A: If you are doing a direct replacement, the terminal IDs (AC1N, AC1H, etc.) are standardized. As long as you label the wires from the old board before disconnecting them, you just match the labels to the same IDs on the new board.Q: What is the lead time if this is out of stock?
A: We usually keep limited stock of this common turbine control part. If currently unavailable, lead times can vary based on global surplus availability. Please contact us directly for a real-time quote and delivery estimate.