 Tel:
 Email:
 WhatsApp:
Description
Key Technical Specifications
| Parameter | Value |
|---|---|
| Input channels | 1 strain gauge / load cell bridge input |
| Converter resolution | 24-bit |
| Module type | Screw-on module (plugs onto a B&R 2000/2003 base plate) |
| System compatibility | B&R 2003 CPU family; not X20-compatible |
| Operating voltage (per supplier listings) | 24 VDC |
| Protection rating | IP20 (control cabinet mounting) |
| Approx. weight | ~0.5 kg |
| Communication | Backplane bus — no fieldbus port on the module itself |
| Condition at time of writing | New surplus / new-in-box via third-party channels |
Product Introduction
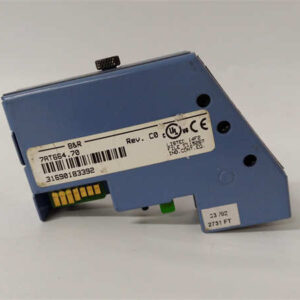
Load cells lie. They drift, they get ground-looped, and then your batch record is wrong and nobody knows why for three weeks. That’s the mess this module was built to avoid.The B&R 7AI261.7 is a single-channel strain gauge input module from the old B&R 2000 screw-on I/O line. One channel. 24-bit resolution. You bolt it onto a base plate next to a 2003 CPU, wire the bridge, and it does one job — turning a physical force into a number the CPU can trust.Engineers pick it because 24 bits is real headroom. On a 50 kg load cell, that’s resolution down in the milligram range before you even start filtering — far more than a 16-bit module gives you when you’re checking fill weights or checking a press curve. It’s also dead simple: no fieldbus address to set, no DIP switches to fight, no firmware to flash. I’ve pulled these out of cabinets that had been running since the mid-2000s and they still read clean. The catch is the platform, not the module. The 2000 series is long gone from B&R’s active catalog, so every unit you buy is surplus, and spare base plates are getting harder to find than the modules themselves.
Quality SOP & Tech Pitfalls
The Lab Report (SOP).
Visual and counterfeit check first — nameplate font, serial, PCB edge, connector plating. A surprising number of “new” B&R modules in the surplus channel are cleaned-up used units. Then bench test: power the base plate with a 24 VDC supply, feed a calibrated strain gauge simulator or a known test weight into the channel, and read the value back through the CPU. Check insulation resistance between the signal terminals and chassis with a megohmmeter. Log the firmware/serial, photograph terminal settings, then anti-static bag, desiccant, sealed box.The Engineer’s Warning (Pitfalls).Two things kill this module in the field.First: buying it for an X20 system. It will not plug into an X20 base plate. The screw-on 2000 series and X20 are physically and electrically incompatible. I’ve seen a purchasing agent order six of these for an X20CP3584 retrofit and the whole order sat in a drawer for a year.Second: skipping the bridge excitation and grounding check. A 24-bit converter is only as good as its analog input. If the load cell shield is grounded at both ends, or the excitation supply is shared with a noisy drive, you’ll get readings that wander by 0.5% and you’ll blame the module.Field story: a packaging line kept failing weight checks on every third shift. Nobody touched the module for two months. Turned out the maintenance tech had re-terminated the load cell cable and grounded the shield at the panel end — while the cell itself was already grounded through the mounting frame. Classic ground loop. The 7AI261.7 was reporting exactly what it was fed.
Installation & Configuration Guide
Phase 1 — Pre-Installation (⚠️)
- ⚠️ Shut down the 24 VDC supply to the base plate at the power feed. This module is not hot-swappable.
- ⚠️ Wait 60 seconds for backplane capacitors to discharge.
- ⚠️ Photograph everything: the old module’s position on the base plate, the terminal wiring, the shield/ground connection, and the CPU’s I/O configuration screen.
Phase 2 — Removal
4. Label the load cell leads (EX+, EX-, SIG+, SIG-, SHIELD) before disconnecting.
5. Release the screw-on retention — do not pry across the PCB edge or the connector pins.
6. Pull the module straight off the base plate.Phase 3 — Installation
7. Confirm the base plate slot number matches the CPU’s I/O configuration. On B&R 2000 systems, the slot defines the module’s address. Wrong slot = CPU fault.
8. Seat the module fully onto the base plate connector before tightening.
9. Reconnect the load cell leads. Ground the shield at one end only.
10. Torque terminals to spec — a loose SIG+ is the most common cause of noisy readings after a swap.Phase 4 — Power-On & Testing
11. Restore 24 VDC. Confirm the CPU’s I/O status LED shows the module as present and healthy.
12. Apply a known test weight or a calibrated simulator signal.
13. Compare the CPU’s read value against your reference. Check zero and span.
14. Only release to production after two consecutive stable readings.
Compatible Replacement Models
| Model | Tier | Notes |
|---|---|---|
| 7AI261.7 (same P/N) | ✅ Drop-in Replacement | 100% match. Confirm it’s new-in-box, not a refurbished unit. Price varies widely — surplus channels list anywhere from ~2,000 to 6,500. |
| B&R X20AI1744 or equivalent X20 analog input | ❌ Hardware Mod Required | Correct path for a modern system, but requires a new X20 base plate, new CPU, and a full I/O reconfiguration. Only worth it during a planned platform migration. |
| Third-party 24-bit strain gauge transmitter (e.g., HBM, Vishay) | ❌ Hardware Mod Required | Works electrically, but you lose the backplane integration and have to add a communication interface. Budget 4–8 hours for wiring and commissioning. |
Frequently Asked Questions (FAQ)
Is the 7AI261.7 an X20 module?
No. It belongs to the older B&R 2000 screw-on I/O series. It will not fit or communicate with an X20 base plate.How many channels does it have?
One. A single strain gauge or load cell bridge input. Any listing claiming 8 channels or ±10 V inputs is describing a different module — trust the OEM datasheet, not the reseller page.Can I hot-swap it while the line is running?
No. Power down the base plate at the 24 VDC feed and wait 60 seconds before touching it.Is it still available from B&R?
As of late 2026, it’s a legacy part. Availability runs through surplus and third-party channels. Get the lead time in writing before you schedule a shutdown — don’t assume it’s off-the-shelf.Why is the price so inconsistent between suppliers?
Because it’s surplus. One channel’s “new in box” is another channel’s refurbished unit. Ask for photos of the actual nameplate and serial number before you pay.Do I need to configure the module after installing it?
No DIP switches and no firmware flash. But you must confirm the slot number matches the CPU’s I/O configuration, or the CPU will fault on startup.What warranty should I expect?
One year is typical from the surplus channels I’ve seen. Because it’s a discontinued part, get the warranty terms in writing — verbal promises don’t mean much when a module fails in month three.