 Tel:
Tel:  Email:
  WhatsApp:
 Description
Key Technical Specifications
| Parameter | Specification | Notes |
|---|---|---|
| Safety Rating | IEC 61508 SIL3 | Machine protection level |
| Analog Inputs | 6 Channels (4-20 mA) | 4 for sensors, 2 for thresholds |
| Input Impedance | 250Ω | Analog input impedance |
| Analog Resolution | 14 bits | For 0-25mA range |
| Sampling Time | 1 ms | Fast response for safety |
| Relay Output Max Current | 2 A | Trip / Fault contacts |
| Relay Output Max Voltage | 220 VDC | Trip contact rating |
| Relay Output Max Power | 150 VA | Relay load capacity |
| Sensor Supply Voltage | 24 VDC | Nominal voltage for field sensors |
| Sensor Supply Current | 20 mA | Nominal current per sensor |
| Global Fuse Size | 375 mA (Slow-acting) | SMD type internal fuse |
| Module Insulation | 1000 Vrms | Bus and relay circuit isolation |
Product Introduction
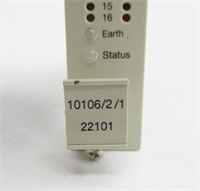
You don’t just plug an MPM123 into a rack and forget about it. This yellow-fronted module belongs to the Rx3i controller family and serves as the ultimate backstop for CONTROSTEAM machinery. It grabs six 4-20mA signals, scales them, and compares them against higher or lower thresholds. If the physics of the machine go sideways, the Trip relay opens. Period. It operates completely isolated from the standard PLC bus, meaning a logic crash in the main controller won’t blind your safety system.Engineers respect this board because it actually meets SIL3 requirements without needing a massive external safety PLC. The 14-bit resolution and 1ms sampling time mean it catches transients that slower cards miss. You can even run a proof test via the front Test input to verify the IEC 61508 compliance without tearing the panel apart. Just be warned: the front push-button for resetting alarms is tempting, but if you reset it without fixing the root cause, you’re just asking for a mechanical failure.
Quality SOP & Tech Pitfalls
Before this module ever leaves our bench, we run it through a strict protocol. We start with a visual counterfeit check, looking for reflowed solder on the P1 and P2 connectors. Next, it goes on a live test rack where we inject 4-20mA signals to verify the 14-bit conversion and force the Trip relay to open at the exact threshold. We check the 375mA slow-acting fuse and verify the 1000 Vrms isolation. Finally, it gets sealed in anti-static packaging with a logged firmware version.Here is where guys mess up: they swap the module and forget that the field sensors might be powered directly by the MPM123’s internal 24V/20mA supply. If you accidentally short a sensor wire during installation, you will blow that internal 375mA SMD fuse. I once watched a tech spend four hours troubleshooting a “dead” module, only to find out he fried the internal sensor supply on his first wiring attempt. Always verify your wiring against the P1/P2 pinout before applying power.
Installation & Configuration Guide
- Pre-Installation: ⚠️ Lockout/Tagout the 24VDC supply. Wait 60 seconds for internal capacitors to discharge. Take a high-resolution photo of the P1 and P2 wiring, and write down the exact positions of any scaling jumpers or DIP switches.
- Removal: Label every wire with a sharpie. Depress the DIN rail clip carefully—these old plastic clips get brittle and snap if you force them. Slide the module straight out.
- Installation: Copy all DIP/Jumper settings from the old module to the new one before seating it. This prevents 90% of startup scaling errors. Align the P1 and P2 connectors perfectly and press firmly until the DIN clip clicks.
- Power-On & Testing: Restore 24VDC. Watch the four front LEDs. Green (OK) should be solid. If Red (Alarm) or Yellow (Trip) lights up immediately, check your threshold inputs. Use the serial link (P3 connector) to read parameters and verify the module is communicating correctly before returning the machine to service.
Compatible Replacement Models
- ✅ Drop-in Replacement: ALSTOM MPM123 (Exact same part number, verify Rev. letter matches your system, e.g., Rev. E).
- ⚠️ Software Compatible: ALSTOM Rx3i Safety Modules (Requires reconfiguring the safety logic in the PLC software and re-verifying the SIL3 loop).
- ❌ Hardware Mod Required: Standard ALSTOM Rx3i Analog Input Modules (e.g., IC694ALG). Do not use these for safety trips. They lack the independent SIL3 relay outputs and hardware isolation. You would have to rewire to an external safety relay, which defeats the purpose of this integrated module.
Frequently Asked Questions
Can I hot-swap this module while the machine is running?
Absolutely not. This is a SIL3 safety device. Pulling it under power will open the Trip relay and likely shut down your machine. Always schedule a maintenance window.Why is the Red Alarm LED on, but the Trip relay hasn’t opened?
The Red LED indicates a degraded condition or a pre-alarm, while the Yellow LED indicates an active Trip. Check your threshold settings. The module compares inputs against both high and low limits; you might be in a warning band, not a trip band.Can I power my 4-20mA transmitters directly from this module?
Yes, but be careful. The module provides 24VDC at a nominal 20mA per sensor. If your transmitters draw more than that, or if you have a ground fault, you’ll blow the internal 375mA slow-acting fuse. Check your transmitter datasheets first.How do I change the scaling or trip thresholds?
You can’t do it from the front panel buttons. You need to plug a hard key into the P1 connector to modify Flash memory, or use the P3 serial link to read parameters. Always document your changes.Is this module compatible with newer GE Rx3i PLCs?
Hardware-wise, it fits the Rx3i rack. Software-wise, you need to verify with the OEM manual that your specific PLC firmware supports the MPM123 data mapping. Don’t assume plug-and-play without checking the compatibility matrix.What does the “Test” input on the front actually do?
It executes a proof test required for IEC 61508 SIL3 compliance. It forces the internal relays and checks the analog paths without actually tripping the machine. Use it during annual maintenance to prove the safety loop is healthy.