 Tel:
 Email:
 WhatsApp:
Description
Key Technical Specifications
| Parameter | Value |
|---|---|
| Part Number | 51307195-175 |
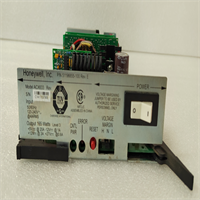
| Model | SC-PCMX01 |
| Platform | Honeywell HC900 (Hybrid Control) |
| Module Class | Controller CPM, 28 Mixed I/O |
| Supply Voltage | 16–30 V DC (nominal 24 V DC) |
| Power Consumption | ~4.6 W (some channel listings cite 10 W — verify with OEM label) |
| Communication | 100M Ethernet, Modbus/TCP (up to 5 concurrent connections) |
| Secondary Ports | RS-232 (config/diagnostics), RS-485 (operator panel) |
| Operating Temp. | Up to 75 °C ambient per OEM label |
| Certifications | CE, UL/cUL, ATEX/IECEx zone markings per label |
| Firmware/HW Rev. | Logged at shipment — request the photo before you buy |
Product Introduction
I’ve pulled more HC900 controllers out of dusty control rooms than I care to count, and this one is a classic “cheap DCS that punches above its price.” Honeywell introduced the HC900 in April 2002 as an open hybrid control system for small and mid-size process users — continuous, logic, and sequence control in one box, talking Modbus/TCP over 100M Ethernet so you’re not chained to proprietary upper-level software. The SC-PCMX01 (51307195-175) is the controller piece of that architecture, carrying 28 mixed I/O points on a 16–30 V DC supply.Engineers buy it for one reason: it kept a plant running when the budget didn’t cover a full Experion migration. The 4.6 W draw and 75 °C ambient rating mean it survives a poorly ventilated cabinet in July. The RS-232 port is a lifesaver when the Ethernet side is misbehaving — you can dial in for diagnostics without touching the network. Honest caveat: this revision is picky about firmware pairing with the operator station software, and I’ve seen more than one “dead on arrival” complaint turn out to be a version mismatch, not a dead module.
Quality SOP & Tech Pitfalls
The Lab Report (SOP)Every unit goes through the same five steps before it leaves:
- Visual / counterfeit check — nameplate characters compared against OEM format, serial and MAC address logged, seal and anti-static bag inspected for re-packaging.
- Live test on test rack — powered at 24 V DC, boot sequence observed, RUN/ERR LEDs verified.
- Insulation resistance & continuity — Fluke 1508 for insulation, Fluke 115 for terminal continuity. Catches moisture damage from warehouse storage.
- Firmware/HW revision logging — read and photographed, screenshot goes in the shipment file.
- Anti-static sealing — wrist strap on, ESD bag, foam-packed box.
The Engineer’s Warning (Pitfalls)Two mistakes account for most of the downtime I’ve seen on this part.First: firmware mismatch. The controller and the PlantScape Vista / operator station must agree. I once watched a plant lose a weekend because a replacement CPM came up healthy, connected, and then refused to accept the downloaded logic. The module was fine. The station software was two revisions behind. Five minutes checking version numbers would have saved forty hours.Second: nobody photographed the old wiring. Mixed I/O means analog and digital channels share the same terminal field. Pull the wires without a photo and you’re guessing which pair was the 4–20 mA loop and which was the 24 V digital input. Guess wrong and you feed 24 V into an analog input. That module is scrap.
Installation & Configuration Guide
Phase 1 — Pre-Installation (⚠️)
- ⚠️ Put the loop in manual, then shut down the controlled process. Do not swap a controller on a live plant.
- ⚠️ Disconnect the 24 V DC supply and wait 5 minutes for bulk capacitors to discharge. Verify 0 V with a multimeter before touching terminals.
- ⚠️ Photograph everything: front nameplate (part number, serial, MAC), rear terminal wiring, and any DIP/jumper settings. Take three angles. This single step prevents 90% of startup failures.
- Back up the existing configuration via RS-232 or Ethernet before removal.
Phase 2 — Removal
- Label every wire with its channel number using the photos as reference.
- Release the DIN rail clips evenly — do not pry one side and let the module hang by its connector.
- Note the slot position. HC900 I/O addressing is slot-dependent.
Phase 3 — Installation
- Copy the DIP switch / jumper settings from the old module onto the new one before mounting. Compare against your photos. This is the step people skip, and it’s the step that costs them a night shift.
- Seat the module fully onto the DIN rail and press until the clip engages with an audible click.
- Reconnect wires channel by channel, cross-checking against the photos. Torque terminals to spec — loose 24 V terminals arc.
Phase 4 — Power-On & Testing
- Restore 24 V DC. Confirm input voltage reads 24 V ±10% at the module terminals, not just at the supply.
- Watch the LED boot sequence. RUN should follow PWR within a few seconds; a stuck ERR means a hardware or revision problem.
- Download the configuration, then verify point-by-point: force a known input, confirm the correct output responds.
- Log the firmware version in your maintenance record.
Compatible Replacement Models
| Tier | Model | Notes |
|---|---|---|
| ✅ Drop-in | SC-PCMX01 51307195-175 (same rev) | 100% match. Price varies widely by channel — quote against at least two sources. |
| ⚠️ Software Compatible | Later HC900 CPM revisions | Same hardware family, but requires firmware flash and logic recompile. Budget 4–8 hours of engineering time plus a commissioning window. |
| ❌ Hardware Mod Required | Honeywell Experion / ControlEdge series | Different chassis, different I/O wiring, different engineering environment. Only make this move as a planned plant upgrade — not as a breakdown repair. |
Frequently Asked Questions
Is this still available new, or is it obsolete stock?
Obsolete platform, honest answer. The HC900 launched in 2002. What you’re buying is New Surplus — factory-sealed old stock, not a current production item. We state the condition on every quote rather than hiding behind the word “new.”Can I hot-swap this safely?
No. It’s a controller, not a hot-swappable I/O card. Remove it from a live system and you drop every loop it owns. Full shutdown, supply disconnected, five-minute discharge wait.Why do reseller listings disagree on what this thing is?
Because most of them are copy-paste. I’ve seen the same part number described as a “remote I/O module,” a “digital input panel,” and a “16 in / 16 out” device. The OEM nameplate says CONTROLLER CPM, 28 MIXED IO. When listings conflict, the nameplate and the Honeywell hardware manual win.What’s the most common reason a replacement won’t work?
Firmware or station-software mismatch, not a defective module. Check the revision on the old nameplate and confirm your operator station software supports it before you install. Costs five minutes; skipping it costs a weekend.Do you test before shipping?
Yes — live test on a test rack, insulation resistance with a Fluke 1508, and firmware logging. Ask for the test report and we send it. If a unit can’t pass, we don’t sell it.What does the warranty actually cover?
12 months from delivery. Non-human-caused failure within that window: we replace it and cover return freight. Damage from overvoltage, wrong wiring, or a botched DIP setting isn’t covered — but we’ll still help you troubleshoot, free.Should I buy one or stock a spare?
If this controller sits on a critical loop, buy a spare now. Lead time on obsolete HC900 parts is unpredictable, and a stockout during a failure costs far more than the module.