 Tel:
Tel:  Email:
  WhatsApp:
 Description
Key Technical Specifications
| Parameter | Specification |
|---|---|
| Part Number | 984865065 |
| Safety Rating | SIL 3 (Safety Integrity Level 3) |
| Processor Type | Intel 386EX (Legacy) or ARM Cortex-A9 (Newer) |
| Clock Speed | 25 MHz (386EX) or up to 1.2 GHz (ARM) |
| Memory | 1 MB Flash / 1 MB SRAM (Standard) or 512MB/128MB (High Perf) |
| Communication | 2 x RS485 (Isolated), SafeEthernet (TCP/IP) |
| Redundancy | Supports 1oo2 (One out of Two) Redundant Configurations |
| Watchdog | Integrated Safety Watchdog (24V Output) |
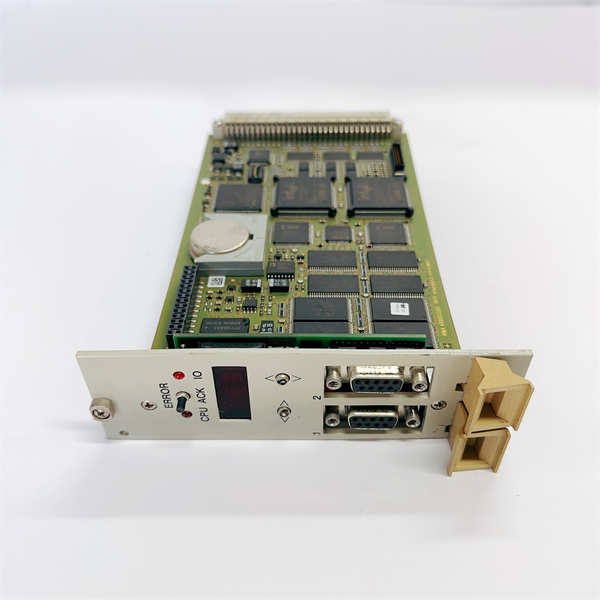
| Diagnostics | 4-Digit Alphanumeric Display + LEDs |
| Power Input | 24 VDC (Nominal) |
| Operating Temp | -20°C to +60°C (varies by enclosure) |
Product Introduction
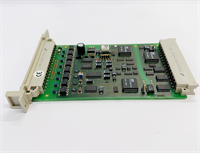
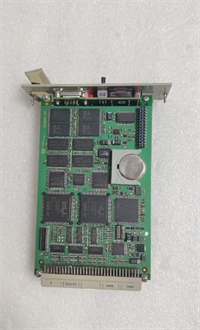
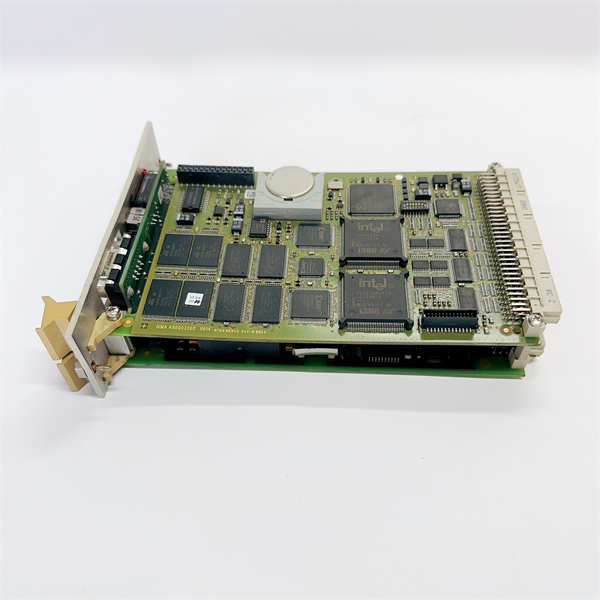
In the world of Safety Instrumented Systems (SIS), you don’t care about “fast”; you care about “certain.” The HIMA F8650X is the central brain of the HIMax system, designed to sit between your basic process control system (like a DCS) and the emergency shutdown valves. Its job is simple: watch the process, and if things go south, kill it safely.The beauty of the F8650X lies in its redundancy. It’s often deployed in a 1oo2 (one out of two) architecture, meaning if one CPU decides to take a nap or fails a diagnostic check, the other takes over instantly without tripping the plant. It handles the heavy logic—Emergency Shutdown (ESD), Burner Management (BMS), and Fire & Gas (F&G). It’s not the newest chip on the block (some run on older 386 architecture), but in safety, old means proven. If you are swapping this, treat it with respect; it holds the logic that keeps the refinery from becoming a crater.
Quality SOP & Tech Pitfalls (The Reality Check)
The Lab Report (SOP)
When I get an F8650X on the bench, I don’t just plug it in and hope for the best. Here is the drill:
- Visual Inspection: Check the capacitors for bulging (common in older units) and the backplane connector pins for bending.
- Boot Test: Power it up. The 4-digit display should cycle through a self-test sequence. If you see “E” codes, the RAM or Flash is suspect.
- Comms Check: Hook up the RS485 port to a laptop running ELOP II. Verify handshake.
- Watchdog Test: Force a fault (if possible via software simulation) to ensure the physical watchdog output drops out. This is the fail-safe mechanism that actually trips the relays.
The Engineer’s Warning (Pitfalls)
Here is where people lose sleep: Firmware Mismatches.The F8650X is picky. If you hot-swap a CPU in a redundant pair, the new unit must have the exact same firmware and application image as the surviving unit. If you stick a fresh-out-of-the-box module in there, it might be running a different OS version. It will refuse to sync, and your system will run in “Non-Redundant Mode,” which defeats the purpose of having a safety system. Always load the project file before inserting the card if you can, or be prepared for a long download session while the plant holds its breath. Also, watch the DIP switches—wrong settings mean the CPU won’t talk to the I/O bus.
Installation & Configuration Guide
This isn’t a standard PLC swap. You are touching the safety logic controller.
- Pre-Installation ⚠️
- Bypass Logic: If possible, force the I/O points to a safe state or use maintenance overrides before pulling the CPU.
- Backup: Ensure you have the latest
.ELOPor project file backed up from the engineering station. - Photos: Photograph the DIP switch settings on the front panel. This is critical.
- Removal
- Disconnect the Ethernet and RS485 cables.
- Release the locking clips. Slide the module out carefully.
- Installation
- Switch Settings: Before sliding the new F8650X in, set the hardware address/DIP switches to match the old one exactly.
- Insert the module into the chassis slot. Seat it firmly.
- Reconnect communication cables.
- Power-On & Testing
- Apply power. Watch the LED sequence.
- Connect via ELOP II software.
- Download: If the module is empty, download the safety logic.
- Sync: If in a redundant pair, monitor the “Sync” status. Wait until both CPUs show “Running/Healthy” before removing maintenance overrides.
F8650X HIMA
Compatible Replacement Models
HIMA has a few variations, but they aren’t all interchangeable.
- ✅ Drop-in Replacement: F8650X (984865065). This is the standard X-CPU 31.
- ⚠️ Upgrade Path: F8652X. This is a higher-performance CPU module. It fits in the same slots but offers more memory and processing power. Good for system upgrades, but requires a full system recompile.
- ❌ Obsolete Legacy: F8627X. This is a communication module, not a CPU. Do not confuse the part numbers.
Frequently Asked Questions (FAQ)
Can I hot-swap the F8650X without shutting down the system?
Technically, yes, the HIMax system supports hot-swapping. However, if you are running in simplex (non-redundant) mode, pulling the CPU will stop your logic execution. Only hot-swap if you have a healthy redundant partner online.What does the “E” code on the display mean?
It’s an error code. Common ones relate to battery failure (for RAM backup) or checksum errors in the flash memory. You’ll need the HIMA diagnostic manual to decode the specific letter/number combo.Why won’t my F8650X connect to ELOP II?
Check your COM port settings. The F8650X usually talks at a specific baud rate (often 19200 or 38400) on the RS485 port. Also, ensure the “SafeEthernet” drivers are installed correctly on your PC.Is the F8650X compatible with the older H41q systems?
No. The F8650X is specifically for the HIMax platform. H41q uses different central modules (like the F60 series). Don’t mix them up.How do I know if I have the Intel or ARM version?
Check the label on the faceplate. The newer revisions with ARM processors usually denote higher performance specs (like 1.2 GHz clock speeds) on the datasheet, whereas the older ones list 25 MHz.