 Tel:
Tel:  Email:
  WhatsApp:
 Description
Key Technical Specifications
| Parameter | Specification |
|---|---|
| Manufacturer | Foxboro (Invensys) |
| Module Type | Analog Output (AO) Module |
| Series | I/A Series (9000/9000+) |
| Number of Channels | 4 channels |
| Output Range | 4-20mA or 0-10V (configurable) |
| Power Supply | 24V DC (typically) |
| Communication | Foxboro I/A Series network (via backplane) |
| Dimensions | 120mm (W) x 100mm (H) x 75mm (D) |
| Mounting | DIN-rail or chassis backplane |
Product Introduction
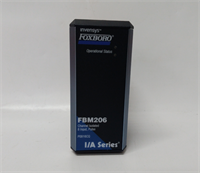
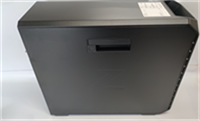
The H92904CC0500 is an analog output (AO) module designed for the Foxboro I/A Series of distributed control systems (DCS). It provides 4 independent channels capable of generating precise analog signals, typically in the range of 4-20mA or 0-10V, to control field devices such as control valves, variable frequency drives (VFDs), and actuators.This module is a critical component in process automation, allowing the control system to modulate the operation of equipment based on the process variable and control algorithm. It installs directly into the I/A Series chassis, connecting to the system’s backplane for data transfer and power.
Installation & Configuration Guide
Preparation (10 min)
- Power Down: Turn off the main power supply to the control panel or chassis. Use a voltage tester to confirm no live circuits are present.
- Static Safety: Put on an ESD wrist strap and connect it to a grounded point on the chassis to prevent damage to the module’s sensitive electronics.
- Verify Compatibility: Ensure the module is compatible with your specific I/A Series chassis and firmware revision.
Removal (5–10 min)
- Cable Disconnection: Loosen the terminal screws on the front of the module. Carefully disconnect the wiring (analog output signals and power) to prevent strain on the solder joints.
- Eject: If the module uses a latch, press the release button or slide the latch to the unlock position. Gently pull the module out of the chassis slot.
- Storage: Place the removed module in an anti-static bag for storage or transport.
Installation (10 min)
- Align: Slide the module into the designated slot in the chassis. Ensure the connector pins align with the backplane.
- Seat the Card: Push firmly until the module is fully seated and the ejector latches (if equipped) snap into place.
- Wiring: Connect the wires to the terminal block.
- Channel 1-4: Connect the positive lead of the 4-20mA/0-10V signal.
- COM: Connect the common return terminal (if required by the device).
- L+/N: Connect the 24V DC power supply to the appropriate terminals.
Power-On & Test (10 min)
- Visual Check: Inspect the front panel for any physical damage or loose connections.
- Power Up: Restore power to the control panel.
- LED Indicators: Monitor the status LEDs:
- RUN/ALM: Green indicates normal operation; red indicates a fault (e.g., open circuit or overvoltage).
- Output LEDs: Blinking or steady indicates the output signal is active.
- Configuration: Verify the DCS recognizes the module on the network and that the output values change according to the control loop setpoints.
Troubleshooting Quick Reference
| Symptom | Probable Cause | Corrective Action |
|---|---|---|
| ALM Light ON | Open circuit or short to ground | Check the wiring continuity to the field device. Ensure the device is powered and functional. |
| No Output Signal | Configuration error | Verify the channel is enabled and scaled correctly in the DCS configuration software. |
| Erratic Output | Electrical noise | Use shielded cables and ensure the shield is grounded at both ends. Install ferrite chokes on the output wires. |
| Output Glitch | Ground loop issue | Check for floating grounds between the DCS chassis and the field device. |
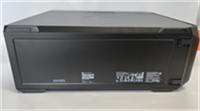
Dimensions, Mounting & Wiring Notes
- Form Factor: DIN-rail mountable or chassis backplane (depends on the installation type)
- Dimensions: 120mm (Width) x 100mm (Height) x 75mm (Depth)
- Mounting: Secure the module to a 35mm DIN rail or insert it into a compatible I/A Series chassis slot.
- Wiring Notes: The output terminals accept 4-20mA or 0-10V signals. Ensure the load (e.g., control valve) has the correct input impedance. The module typically requires a 24V DC power supply.
H92904CC0500 FOXBORO
FAQ
Can I use this module with a different brand of DCS?
No, the H92904CC0500 is specifically designed for the Foxboro I/A Series control system. It uses proprietary communication protocols and physical dimensions that are not compatible with other brands like Siemens, Allen-Bradley, or Mitsubishi.What is the accuracy of the analog output?
The accuracy is typically within ±0.1% of full scale, depending on the calibration and environmental conditions. For precise process control, regular calibration is recommended.Is this module hot-swappable?
Yes, the H92904CC0500 is generally hot-swappable in the Foxboro I/A Series chassis, meaning you can replace it without powering down the entire system. However, it is always best practice to follow the manufacturer’s specific procedures for your system version.What is the difference between H92904CC0500 and H92904CC0510?
The primary difference is the output type or range. The “0500” version typically outputs 4-20mA, while the “0510” version might output 0-20mA or have a different configuration. Always refer to the specific datasheet for the exact specifications of each part number.Can I use this module to control a VFD?
Yes, if the VFD is configured to accept a 4-20mA or 0-10V analog signal for speed control. The H92904CC0500 can provide the modulating signal required by the VFD to adjust its output frequency.
FOXBORO H92904CC0500 Analog Output Module