 Tel:
 Email:
 WhatsApp:
Description
Key Technical Specifications
| Parameter | Specification |
|---|---|
| Manufacturer | Teledyne DALSA |
| Model | CR-GEN0-M6400R3 |
| Product Family | Genie Nano GigE Vision area scan camera |
| Sensor Type | CMOS, progressive scan, global shutter |
| Interface | GigE Vision |
| Lens Mount | Typically C-mount on Genie Nano family; verify per unit |
| I/O | GPIO trigger and strobe signals on Genie Nano family |
| Power | PoE or external DC via GPIO, verify per label |
| Software | Sapera LT / Sapera SDK compatible |
| Operating Temperature | Confirm from OEM datasheet or nameplate |
| Housing | Compact all-metal industrial housing |
| Application | Machine vision inspection, measurement, positioning, identification |
| Status | Legacy part; cross-check exact sensor and revision |
Product Introduction
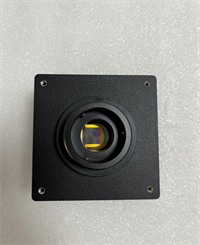
Genie Nano cameras are the kind of parts that disappear inside a machine vision station until someone needs a replacement. They are small, rugged, and designed to sit on a production line and deliver consistent images without drama.The Teledyne DALSA CR-GEN0-M6400R3 belongs to the Genie Nano GigE Vision camera family. It is an area scan industrial camera built for machine vision applications such as inspection, gauging, guidance, and identification. Genie Nano cameras typically use CMOS global shutter sensors, support GigE Vision, and integrate with Teledyne DALSA Sapera software.The “M640” style designation commonly appears in Genie Nano M640 variants, which are monochrome models based on a VGA-class CMOS sensor. However, CR-GEN0-M6400R3 is an older ordering code, so I will not lock in exact resolution, frame rate, lens mount, or I/O mapping without a confirmed datasheet or label photo. On Genie Nano systems, the camera connects over a single GigE cable, and many models support PoE, hardware triggering, and TurboDrive for higher effective throughput on a standard GigE link.
Quality SOP & Tech Pitfalls
The Lab Report (SOP)
- Label verification: confirm Teledyne DALSA marking, CR-GEN0-M6400R3 model code, and serial number.
- Physical inspection: check housing, lens mount, GigE connector, GPIO connector, and mounting threads.
- Power and link test: verify PoE or external DC operation and confirm GigE link establishment.
- Image acquisition test: connect to Sapera LT or a GenICam-compatible viewer and confirm live image.
- Trigger and I/O test: validate hardware trigger, strobe output, and GPIO behavior if required by the application.
- Documentation: record model code, firmware version, connector condition, and test results before ESD packing.
The Engineer’s Warning (Pitfalls)
- Do not assume resolution from the part number alone. Legacy DALSA ordering codes can be ambiguous. Always confirm sensor resolution and frame rate from the label or datasheet.
- GigE bandwidth is not unlimited. If the camera runs at high frame rates, verify switch capacity, cable quality, jumbo frame settings, and TurboDrive support before blaming the camera.
- Lens mount matters. Genie Nano cameras may ship with C-mount, CS-mount, or other variants. A mismatched mount will prevent proper focus.
- Trigger polarity can break timing. Incorrect GPIO configuration may cause missed triggers, double triggers, or unstable exposure.
Installation & Configuration Guide
1. Pre-Installation
Verify the host PC or vision controller supports GigE Vision. Confirm PoE availability or prepare an external DC supply. Check that Sapera LT or a compatible GenICam application is installed.2. Mechanical Installation
Mount the camera using the standard mounting threads. Install the lens and secure the lens lock ring. Avoid stressing the GigE or GPIO connectors. Use screw-lock Ethernet cables in vibration-prone installations.3. Network Configuration
Connect the camera to a dedicated GigE port or industrial switch. Assign a static IP address if required. Enable jumbo frames if recommended by the vision system integrator. Confirm the camera appears in the network device list.4. Acquisition Testing
Open the camera in Sapera LT or the vision application. Verify live image, exposure, gain, and trigger mode. Run a short acquisition test under actual lighting conditions. Save the configuration before returning the system to production.

Compatible Replacement Models
| Model | Compatibility | Notes |
|---|---|---|
| CR-GEN0-M6400R3 (same revision) | Drop-in replacement | Confirm label, firmware, and connector type |
| Other Genie Nano M640 variants | ️ Engineering validation required | Verify sensor, mount, I/O, and firmware |
| Modern Genie Nano GigE cameras | ️ Software/mechanical validation required | May need reconfiguration in Sapera or vision software |
| Non-DALSA GigE Vision cameras | Hardware/software adaptation required | Not a direct replacement without integration review |
Frequently Asked Questions (FAQ)
Q: Is CR-GEN0-M6400R3 still in production?
It is a legacy Teledyne DALSA Genie Nano part number. Expect surplus or tested stock rather than current production.Q: What is the resolution of this camera?
The “M640” family is commonly associated with a VGA-class monochrome sensor, but the exact resolution must be confirmed from the nameplate or OEM datasheet.Q: Can I use it with standard GigE switches?
Yes, it is a GigE Vision camera. For stable high-speed operation, use a quality switch, proper cabling, and correct network settings.Q: Does it support PoE?
Most Genie Nano cameras support PoE or external DC via GPIO, but confirm this on the specific unit label.Q: Can I replace it with a newer Genie Nano camera?
Often yes, but lens mount, I/O mapping, firmware, and vision software configuration must be validated before substitution.Q: Do you have the official datasheet?
Not verified yet for this exact ordering code. Send a clear photo of the camera label and I am happy to cross-check the exact specifications.