 Tel:
Tel:  Email:
  WhatsApp:
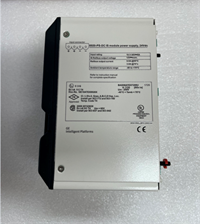
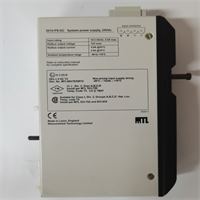
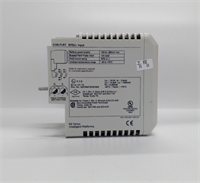
 Description
Key Technical Specifications
| Parameter | Specification |
|---|---|
| Input Voltage (DC) | 18-32VDC (Nominal 28VDC) |
| Input Voltage (AC) | 220VAC Main / 38VAC & 115VAC Control Transformer |
| +24VDC Output | 3A (Unregulated, full-wave rectified) |
| +5VDC Output | 4A (Regulated with TTL fault signal) |
| -24VDC Output | 1A |
| +/-15VDC Output | 0.8A per channel (0.25A available for external load) |
| Trip Solenoid Rating | 125VDC |
| Physical Dimensions | 33.0 cm (H) x 17.8 cm (W) |
| Mounting Type | DIN Rail Mount |
| Protection | Internal Fuses (FU1, FU2, FU3) with LED Indicators |
| Origin | USA |
Product Introduction
In a GE Mark VI turbine control system, the DS200TCPDG2BEC is the unsung hero that keeps the lights on. It is a dedicated power distribution board belonging to the EX2000 excitation series. Without this module properly conditioning and distributing power, your expensive processor and I/O boards are just expensive paperweights.What makes this board reliable in the field is its robust internal protection and clear fault indication. It handles a wide input range (18-32VDC) and provides multiple regulated outputs (+5V, +/-15V, +24V) simultaneously. A key feature engineers appreciate is the built-in fuse protection (FU2/FU3 7A fuses) paired with dedicated LED indicators (CR51/CR55). If a short circuit happens on the rack, you don’t need a multimeter to find it—the board literally lights up and tells you exactly where the problem is, saving hours of troubleshooting during a critical outage.
Quality SOP & Tech Pitfalls (The Reality Check)
The Lab Report (SOP)
We treat power boards with extreme caution because a bad power supply can fry an entire rack of electronics. Here is our pre-shipment protocol:
- Visual & Counterfeit Check: We inspect the PCB for any burn marks around the fuse holders (FU1, FU2, FU3) and verify the “GE Boards & Turbine Control” silkscreen and USA origin markings.
- Live Load Test: We connect the board to a variable 28VDC source and use electronic loads to verify the +5VDC (4A) and +24VDC (3A) rails remain stable under load.
- Fuse & LED Verification: We simulate a fault condition to ensure the internal fuses blow safely and the corresponding fault LEDs (CR51/CR55) illuminate as designed.
- Anti-static Sealing: The board is placed in a shielded anti-static bag with foam padding to prevent physical damage to the terminal blocks during shipping.
The Engineer’s Warning (Pitfalls)
Here is a brutal reality check: do not ignore the DIP switches. This board has several DIP switches (SW4, SW5, SW6) that configure input voltage scaling and motor voltage feedback attenuation. I have seen technicians swap this board, power it up, and wonder why the turbine control logic is reading crazy voltage values. They forgot to copy the switch settings from the old board. Also, be extremely careful with the signal wire terminals (AC1N, AC1H, etc.). If you cross an AC input with a low-voltage DC signal line during re-wiring, you will instantly destroy the new board.
Installation & Configuration Guide
Follow this 30-minute swap guide to replace the DS200TCPDG2BEC safely.
- Pre-Installation & Safety
- ⚠️ Warning: Shut down the Mark VI control system and disconnect all main power sources (28VDC and any AC inputs). Wait at least 2 minutes for capacitors to discharge.
- Take a high-resolution photo of the existing DIP switch positions (SW4, SW5, SW6) and every single wire connected to the terminals.
- Removal
- Label every wire with its terminal ID (e.g., AC1N, AC1H, AC2N, AC2H) using masking tape or wire markers.
- Use a screwdriver to loosen the terminal screws and carefully disconnect the signal wires.
- Release the DIN rail clip and slide the faulty board out of the cabinet.
- Installation
- Copying Settings: Before mounting the new DS200TCPDG2BEC, set the DIP switches (SW4, SW5, SW6) to exactly match the positions you photographed on the old board. This step prevents 90% of startup configuration errors.
- Mount the new board onto the DIN rail and ensure it is locked firmly in place.
- Reconnect the labeled wires to their matching terminals. Tug gently on each wire to ensure the screw terminals have a solid grip.
- Power-On & Testing
- Restore the 28VDC auxiliary power.
- Observe the LEDs. The “OK” LEDs should illuminate, and no fault LEDs (like the fuse indicators) should be lit.
- Use a multimeter to verify the +5VDC and +24VDC test points on the board before re-engaging the full turbine control logic.
Compatible Replacement Models
| Compatibility | Model Recommendation | Notes |
|---|---|---|
| ✅ Drop-in Replacement | DS200TCPDG2BEC | 100% hardware match. Ensure the firmware/EEPROM settings (DIP switches) are copied over. |
| ⚠️ Hardware Mod Required | DS200TCPDG1BEC | Physically similar, but the “1B” revision often has different voltage scaling or I/O definitions. Requires careful verification of the OEM manual before use. |
| ⚠️ Hardware Mod Required | DS200DCFBG1BLC | This is a different power feedback board. It will not fit or function as a direct replacement for the TCPDG series. |
Frequently Asked Questions (FAQ)
Q: Can I use this board if my system uses 115VAC instead of 28VDC?
A: The DS200TCPDG2BEC is primarily designed for a 28VDC (18-32VDC) input. While it has some internal transformer capabilities for 115VAC control power, using it in a system designed strictly for a different voltage profile requires verifying your specific system schematics. Mismatching the main input voltage will blow the internal fuses immediately.Q: What do the CR51 and CR55 LEDs indicate?
A: These are fuse blown indicators. If CR51 or CR55 lights up, it means the 7A fuses (FU2 or FU3) protecting the power outputs have blown due to a short circuit or overload downstream. You will need to find the short before replacing the fuse and the board.Q: Is the DS200TCPDG2BEC compatible with Mark V systems?
A: No. This board is specifically designed for the GE Mark VI and Mark VIeS safety control systems. The Mark V series uses entirely different board form factors and architectures (like the TCQA boards). Do not try to force this into a Mark V rack.Q: Why are there multiple output voltages (+5V, +24V, +15V)?
A: The Mark VI rack distributes power to various components. The +5VDC (4A) is typically for the digital logic and processors, the +/-15VDC is for analog signal conditioning, and the +24VDC (3A) powers relays and discrete I/O. This board consolidates all those power needs into one unit.Q: Do I need to download firmware to this board?
A: Generally, no. The DS200TCPDG2BEC is a hardware-centric power distribution board. Its configuration is handled via the physical DIP switches (SW4, SW5, SW6) for voltage scaling. It does not require a software flash like a CPU or processor board.