 Tel:
Tel:  Email:
  WhatsApp:
 Description
Product Introduction
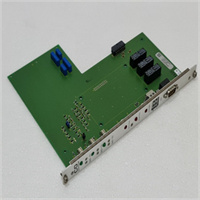
If you are troubleshooting a motion controller rack and see the part number 3156114-746, you are likely looking at a critical logic or interface board for an industrial machine. The AE APEX3013 is a specialized PCB assembly designed to slot into larger control cabinets, handling either I/O processing or specific motion sequencing tasks depending on the machine’s architecture.This board is a specific revision (-746) of the APEX3013 series, meaning it has a unique component layout or firmware version that must match the host system. Unlike generic power supplies, this logic board requires precise voltage regulation and ESD protection during handling. In my experience with similar industrial electronics, this specific suffix often correlates to a specific revision level required for backward compatibility with older machinery—swapping it with a newer revision could cause a firmware mismatch error.
Key Technical Specifications
| Parameter | Value |
|---|---|
| Full Part Number | 3156114-746 |
| Series Designation | APEX3013 |
| Component Type | Printed Circuit Board (PCB) |
| Primary Function | Control Logic / Signal Processing |
| Condition | New Original (New Surplus) |
| Warranty | 1-Year Standard (Typical) |
| Handling | ESD Sensitive |
| Compatibility | Specific to AE / OEM Equipment Models |
Application Scenarios & Pain Points
Finding a spare for a board like the 3156114-746 usually happens during a frantic search to keep a production line running. When this board fails, the machine often goes into a “Safe State” or loses communication with the axis drives. The biggest headache isn’t just finding the board, but finding the exact revision that matches the firmware on the rest of the machine.
- Legacy Machine Uptime: You are maintaining a 10+ year old CNC or packaging machine where the OEM no longer supports the software. You need the exact board revision to avoid a system reflash.
- Last-Time-Buy Scenario: The machine model is End-of-Life (EOL), and the factory has stopped making this specific PCB. If you don’t have a spare, a blown board means the machine is scrap.
- Troubleshooting Trap: Sometimes the board isn’t actually dead; the issue is a blown fuse or a connector pin on the backplane. Don’t throw the old board away until you verify the input voltage isn’t spiking.
Quality Control Process (SOP Transparency)
Dealing with vintage industrial PCBs requires a different approach than testing new sensors. Here is how we vet the 3156114-746:
- Visual Inspection: We examine the solder joints under magnification for “cold solder” cracks, a common failure point in boards that have cycled through temperature changes for years.
- Continuity Test: We check for shorts between power and ground rails. A dead short here usually means a fried voltage regulator that needs replacement.
- Component Verification: We verify the presence and orientation of all DIP switches and jumpers, as these often get moved accidentally during storage.
- Cosmetic Audit: We check for corrosion or capacitor bulging, which is common in older electronics stored in humid environments.
Installation Pitfalls Guide (“Lessons Learned” Voice)
Listen, I have seen this board get killed more times by bad handling than by old age. Here is the hard truth:
- The ESD Rule: ❗ Never install this board with bare hands or on a nylon carpet. These boards use sensitive CMOS logic. If you don’t have a grounded wrist strap, at least touch the metal chassis of the machine before touching the board. One zap and that $2k board is toast.
- Connector Alignment: The edge connector on these boards is tight. If it feels stiff, don’t force it. Check for misaligned pins on the backplane. Forcing it will snap the traces right off the PCB.
- Firmware Version: Do not assume this board is plug-and-play. If your machine uses an older firmware version, this new board might need a firmware downgrade before it will talk to the CPU. Check the revision sticker on the board against the one on the rack.
- Power Supply Check: Before you plug in the new board, measure the voltage on the backplane. If the main PSU is putting out 30V instead of 24V, it will fry the new board instantly.