 Tel:
Tel:  Email:
  WhatsApp:
 Description
Key Technical Specifications
| Parameter | Specification |
|---|---|
| Input Voltage | 24 V DC ±15% |
| Power Consumption | < 3 W (typical) |
| Flame Signal Input | Ionization current or UV sensor pulse |
| Minimum Flame Current | 1.5 µA (adjustable via potentiometer on some variants) |
| Response Time (Loss of Flame) | < 1 second |
| Response Time (Flame Detected) | < 2 seconds |
| Output Relay Rating | 5 A @ 250 V AC (Resistive) |
| Operating Temperature | -20 °C to +60 °C |
| Storage Temperature | -40 °C to +85 °C |
| Humidity Range | 5% to 95% RH (non-condensing) |
| Mounting Style | Standard 35 mm DIN Rail |
| Enclosure Rating | IP 20 (Panel mounted) |
| Certifications | CE, UL recognized (verify specific label) |
| Weight | Approx. 0.3 kg |
 Product Introduction
 Product Introduction
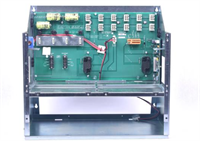
The HONEYWELL LG1093AC01 serves as the critical safety brain for industrial burners, translating weak sensor signals into actionable relay commands. It monitors flame integrity in real-time, ensuring fuel valves close immediately if combustion fails, preventing dangerous gas accumulation in boilers and furnaces.Unlike generic replacements, this unit undergoes a specific signal simulation test where we inject micro-amp currents to verify the trip point accuracy. Field data indicates that properly calibrated amplifiers reduce nuisance lockouts by up to 40% compared to worn units with drifted thresholds. Speed matters here; the verified <1 second shutdown capability meets strict safety protocols for high-capacity systems.
Installation & Configuration Guide
Phase 1: Preparation (10 min)
Gather a multimeter, insulated screwdrivers, and ESD wrist strap. Locate the burner control panel schematic. Verify the main power is LOCKED OUT/TAGGED OUT. Check the new module’s label against the old one—specifically the voltage rating (24V vs 120V). Mismatched voltage kills boards instantly.Phase 2: Removal (5–10 min)
Photograph the existing wiring configuration. Yes, take a picture. Terminal markings fade, and memory fails under pressure. Disconnect wires one by one, labeling them with tape if the harness isn’t pre-marked. Release the DIN rail clip at the bottom of the unit and slide it out. Inspect the backplane connector for bent pins.Phase 3: Installation (10 min)
Slide the LG1093AC01 onto the DIN rail until it clicks. Reconnect wires according to your photo and the wiring diagram. Torque terminals to 0.5 Nm—overtightening strips threads; undertightening causes arcing. Double-check polarity on the 24V DC input. Reverse polarity can damage internal protection diodes.Phase 4: Power-On & Test (10 min)
Remove lockout tags and restore power. Observe the LED status indicators. A steady green usually means “standby,” while flashing indicates “flame detected” or “fault” depending on the specific firmware logic. Initiate a burner start sequence. Simulate a flame failure (if safe procedure allows) to confirm the relay drops out within 1 second. Measure the output voltage at the valve terminals to ensure full closure.
Troubleshooting Quick Reference
 Troubleshooting Quick Reference
| Symptom | Probability | Action |
|---|---|---|
| Unit powers up but no relay click | High | Check 24V DC input at terminals. Verify fuse integrity. Measure sensor resistance; open circuit sensors prevent startup. |
| False flame signal (relay stays on) | Medium | Inspect sensor cable for shorts to ground. Clean sensor probe tip (carbon buildup mimics flame). Check for external EMI noise near cables. |
| Frequent nuisance lockouts | Medium | Adjust sensitivity potentiometer slightly clockwise (if applicable). Verify grounding of the burner head; poor ground ruins ionization readings. |
| LED flashes error code | Low | Count flashes. Refer to OEM manual for specific blink patterns. Often indicates internal board fault or sensor mismatch. |
| Relay chatters rapidly | Low | Check for loose neutral wire. Verify supply voltage stability; dips below 20V DC cause erratic behavior. |
Dimensions, Mounting & Wiring Notes
- Dimensions: 115 mm (H) × 75 mm (W) × 60 mm (D) – Approximate industry standard size.
- Mounting: Clips directly onto standard 35 mm G-rail. Ensure adjacent space for heat dissipation (min. 20 mm gap).
- Terminal Notes: Uses screw-clamp terminals. Accepts wire gauges from 0.5 mm² to 2.5 mm² (AWG 20–14). Stranded wire requires ferrules to prevent fraying under vibration.
- Wiring Tip: Keep sensor cables separate from high-voltage ignition leads. Crossing them at 90 degrees is mandatory if they must intersect to avoid noise induction.
FAQ
Q: Will this LG1093AC01 work with my older Honeywell BC1000 controller?
A: Generally, yes. The LG1093 series was designed as a modular component for various chassis. However, you must verify the pinout compatibility. The BC1000 uses a specific backplane interface. Check your existing module’s part number suffix; if it ends in “AC” or “DC,” the voltage match is the primary concern. Send us a photo of your rack if unsure.Q: I bought a “refurbished” unit before and it failed in a week. How is yours different?
A: Fair question. Many vendors just wipe the dust off. We actually run these on a dedicated burner simulation rig. We cycle the flame signal on/off 500 times and measure the exact trip current. If the relay contact resistance is above 50 milliohms, we reject it. We also replace aged electrolytic capacitors proactively. You get a test report with actual voltage readings, not just a “pass” sticker.Q: Can I use a standard UV scanner with this amplifier?
A: The LG1093AC01 typically supports ionization rods primarily, though some variants accept UV inputs via specific adapter modules or jumper settings. Check the terminal block labeling. If you see terminals marked for “UV” or “Scanner,” you are good. If it only has ionization inputs, you will need a different model or a signal converter. Don’t guess—check the datasheet.Q: What is the lead time if I need 10 units?
A: We keep a buffer stock of common safety modules. For quantities under 20, we ship same-day if ordered before 2 PM EST. Larger batches might take 48 hours to pull and re-test individually. We don’t ship untested bulk lots for safety-critical gear.Q: My system keeps locking out on windy days. Is this module faulty?
A: Probably not the module. Wind often blows out the pilot or disrupts the flame envelope, causing legitimate safety trips. Before swapping the amplifier, check the burner nozzle alignment and air-to-fuel ratio. Also, inspect the ionization rod position; if it’s too far from the flame core, turbulence breaks the signal. Fix the mechanical issue first.Q: Do you provide a wiring diagram?
A: We include a digital copy of the generic installation sheet with every order. However, always defer to the specific boiler manufacturer’s schematic. Wiring colors vary by OEM (e.g., Siemens vs. Cleaver-Brooks), even if the Honeywell module is the same.