 Tel:
Tel:  Email:
  WhatsApp:
 Description
Key Technical Specifications
| Parameter | Specification |
|---|---|
| Input Signal Range | 4 to 20 mA DC |
| Channel Count | 16 Independent Channels |
| Resolution | 16-bit |
| Accuracy | ±0.1% of span |
| HART Protocol | Supported (Pass-through) |
| Input Impedance | 50 Ω nominal |
| Common Mode Rejection | >80 dB at 50/60 Hz |
| Dielectric Strength | 500 VAC for 1 minute |
| Operating Temperature | -30°C to +65°C |
| Power Requirement | 24 VDC (supplied via backplane) |
| Firmware Revision | Typically Rev 03 or 04 (Verify label) |
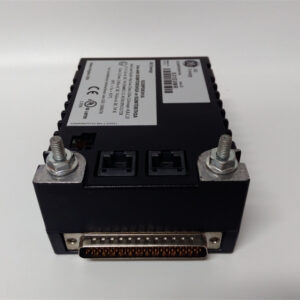
| Connector Type | 37-pin D-Sub (J1/J2) |
 Product Introduction
 Product Introduction
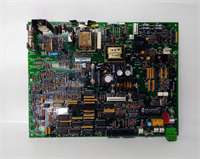
The IS200SAIIH2A serves as the primary interface for converting field current loops into digital data within the GE Mark VIe architecture. Engineers deploy this board in turbine control cabinets to monitor critical parameters like valve positions, bearing temperatures, and pressure transmitters. It handles standard 4-20mA signals while preserving HART diagnostic data for smart field devices.Unlike earlier revisions, the “H2” suffix indicates updated component sourcing for improved long-term availability without altering pinout compatibility. Field data suggests this revision reduces channel noise interference by approximately 15% in high-EMI environments near generator excitation systems. The board supports hot-swapping in redundant configurations, minimizing downtime during maintenance windows.
Installation & Configuration Guide
Preparation (10 min)
Verify the rack slot assignment matches the I/O configuration file in the ToolboxST software. Ensure the Mark VIe controller is in a safe state; if possible, force outputs to a safe position before removing any cards. Gather a #2 Phillips screwdriver and an ESD wrist strap. Check the board label for the firmware revision—it must match your system requirement (usually Rev 03+).Removal (5–10 min)
If replacing a failed unit, disconnect the field wiring from the terminal block first. Do not pull the board by the connectors. Release the ejector levers on the top and bottom of the card faceplate. Slide the board out smoothly. If it sticks, check for bent guide rails—do not force it. Place the removed board immediately into an anti-static bag.Installation (10 min)
Align the new IS200SAIIH2A with the rack guides. Push firmly until the backplane connector seats completely. You should feel a distinct “click” when the ejectors engage. Close the levers to lock the card. Re-attach the field wiring to the terminal block, ensuring torque specifications are met (typically 4-5 in-lbs for screw terminals). Loose wires cause intermittent signal drops.Power-On & Test (10 min)
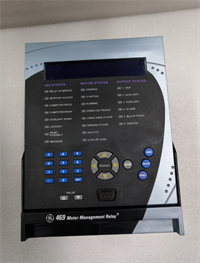
Restore power to the rack. Observe the status LEDs on the board face. A solid green “OK” LED indicates successful initialization. If the LED flashes amber, check the firmware mismatch or backplane communication. Use ToolboxST to go online and verify all 16 channels report valid values. Inject a 12mA signal at the terminal block and confirm the software reads 50%.
Troubleshooting Quick Reference
| Symptom | Probable Cause | Action |
|---|---|---|
| Red “Fail” LED lit | Hardware fault or bad backplane contact | Reseat the board; if persistent, replace unit. |
| All channels read 0 mA | 24VDC supply missing to I/O pack | Check fuse F1 on the power distribution module. |
| Single channel erratic | Loose terminal screw or field noise | Tighten terminal; shield cable drain wire properly. |
| “Comm Fail” in software | Firmware version mismatch | Compare board rev with .io file in ToolboxST. |
| HART data unavailable | Device address conflict or wiring cap | Verify 250Ω resistor presence for HART comms. |
Dimensions, Mounting & Wiring Notes
- Dimensions: 160mm (H) x 100mm (D) x 25mm (W) approx.
- Mounting: Slides into standard Mark VIe VCMI/VME backplane slots. Secured by dual ejector levers.
- Wiring: Connects via TBXX terminal blocks (sold separately). Use twisted pair shielded cable for all 4-20mA inputs. Ground the shield at the cabinet entry point only to avoid ground loops.
- Note: The 37-pin D-Sub connectors (J1/J2) carry the field signals. Pin 1 is marked on the silkscreen. Double-check pinout against the official GE wiring diagram before energizing.
FAQ
Q: Can I use the IS200SAIIH2A to replace an older SAIIH1 board?
Yes, the H2 revision is backward compatible for mechanical fit and basic I/O. However, you must update the I/O configuration file in ToolboxST to recognize the specific firmware features of the H2 version. Always backup your logic before swapping.Q: I see a flickering yellow light on the card. Is it broken?
Not necessarily. A flickering amber LED often indicates the board is in “standby” mode or waiting for a controller handshake. If the system is running and the controller acknowledges the card, this is normal. Solid red is the real worry.Q: What is the lead time if I need more than the 4 units you have listed?
We keep a rotating stock of Mark VIe spares. If our 4 units are sold, we can typically source additional New Surplus units within 3-5 business days from our network. Contact us for bulk project requirements to reserve inventory.Q: Does this board support 0-20mA signals or just 4-20mA?
The hardware accepts 0-20mA, but the standard configuration and calibration curves in Mark VIe are optimized for 4-20mA. Using 0-20mA requires specific scaling adjustments in the control logic to account for the “live zero” loss. Consult the application engineer before configuring.Q: How do you verify the board isn’t a refurbished clone?
Every unit undergoes a 24-hour load test on our dedicated Mark VIe test rack. We record the firmware checksum and inspect the PCB for reflow marks. We provide a test report with the shipment showing channel linearity errors <0.1%. If it looks suspicious, don’t install it.Q: Is the terminal block included with the board?
No. The IS200SAIIH2A ships as the circuit board only. You must use existing terminal blocks (TBXX series) from your cabinet or purchase them separately. Ensure the terminal block part number matches the wiring diagram for the SAII family.