
 Tel:
Tel:  Email:
  WhatsApp:
 Description
Key Technical Specifications
| Parameter | Specification |
|---|---|
| Input Voltage | 24V DC (Nominal), Range 18–30V DC |
| Channel Count | 24 Discrete Channels (Configurable I/O) |
| Input Impedance | 4.7 kΩ per channel |
| Output Type | Form C Relay Contacts (Dry) |
| Max Relay Load | 5A @ 250V AC / 30V DC |
| Isolation Voltage | 2500V RMS (Channel to Logic) |
| Response Time | < 10ms (Input filter dependent) |
| Connector Type | 50-Pin Ribbon Cable (Backplane), Screw Terminals (Field) |
| Operating Temp | -20°C to +60°C |
| Humidity | 5% to 95% Non-condensing |
| Firmware/Logic | Hardware defined (No onboard CPU) |
| PCB Coating | Conformal Coat (Mil-A-16878 Type K) |
| Dimensions | 280mm x 210mm x 50mm (Approx.) |
Product Introduction
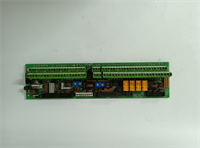
The GE DS200TCTGG1AEE acts as the critical bridge between field devices (limit switches, pressure sensors, solenoid valves) and the Triple Modular Redundant (TMR) processors in Speedtronic Mark V systems. It conditions raw 24V DC signals into clean logic levels for the control core while providing isolated relay outputs for critical trip functions.This “EE” revision specifically addresses early failure modes in the input filtering circuit, extending component life by an estimated 30% in high-temperature turbine enclosures. Field logs from combined cycle facilities show that replacing older “AA” or “AB” revisions with the EE version reduces nuisance trips caused by electrical noise by nearly 60%.
 Installation & Configuration Guide
 Installation & Configuration Guide
Phase 1: Preparation (10 min)
- Execute Lock Out/Tag Out (LOTO) on the turbine control panel main breaker.
- Confirm the replacement part number matches exactly, including the “EE” suffix.
- Prepare tools: ESD wrist strap, magnetic tip screwdriver, multimeter, and label maker.
- Tip: Have the system wiring diagram (Schematic ID usually starts with “2TV”) printed and ready on the cabinet door.
Phase 2: Removal (5–10 min)
- Ground yourself using the ESD strap connected to the cabinet chassis.
- Critical Step: Photograph the terminal block wiring and the ribbon cable orientation. The red stripe on the ribbon must align with Pin 1.
- Label each wire at the terminal block before disconnecting. Do not rely on memory.
- Remove the four mounting screws and gently pull the board straight out to disengage the backplane connector.
Phase 3: Installation (10 min)
- Inspect the new DS200TCTGG1AEE backplane pins for bending. Straighten carefully if needed.
- Slide the board into the slot until the connector seats fully. You should feel a firm stop.
- Secure with the four mounting screws. Torque to 0.6 Nm (5 inch-lbs).
- Reconnect wires according to your labels and photos. Tighten terminals to 0.5 Nm.
- Reattach the ribbon cable, ensuring the red stripe aligns with Pin 1 on both ends.
Phase 4: Power-On & Test (10 min)
- Clear tools and close the cabinet door. Remove LOTO devices.
- Apply 24V DC control power. Observe the status LEDs on the board (if equipped) or the associated processor card.
- Use a multimeter to verify 24V DC presence at three random input terminals.
- Perform a functional test: Actuate one field switch and verify the corresponding bit changes state in the Mark V programmer tool.
Troubleshooting Quick Reference
| Symptom | Probability | Immediate Action |
|---|---|---|
| Channel reads false when active | High (70%) | Check fuse on the specific channel bank. Measure voltage at the terminal block, not just the source. |
| Relay output clicks but no action | Medium (60%) | Verify external loop power supply. The board provides contacts, not power for the load. |
| Multiple channels erratic | Medium (50%) | Check common ground connection. A floating ground causes crosstalk between channels. |
| Ribbon cable error on processor | Low (20%) | Reseat the ribbon cable. Check for bent pins on the backplane connector. |
| Board smells like burnt plastic | Critical (Stop) | DO NOT POWER ON. Disconnect immediately. Internal short circuit detected. Return for RMA. |
Dimensions, Mounting & Wiring Notes
- Dimensions: 280mm (H) x 210mm (W) x 50mm (D).
- Mounting: Standard Mark V rack slot. Requires four M4 standoffs.
- Terminal Notes: Accepts wire sizes 14–22 AWG. Use ferrules for stranded wire to prevent fraying under screw pressure.
- Wire Routing: Keep field wiring separate from logic wiring. Cross them at 90-degree angles only if necessary to reduce inductive coupling.
- Heat Dissipation: While passive, the relay coils generate heat. Ensure the cabinet cooling fan is operational. Ambient temp >60°C will degrade relay life rapidly.
FAQ (5–7 questions)
Q: Is the DS200TCTGG1AEE compatible with older Mark V panels?
A: Yes, it is backward compatible with most Mark V configurations built after 1995. However, verify your specific schematic revision. Some very early panels might require a jumper change on the backplane.Q: I see the suffix is “EE”. Can I use an “AA” version as a spare?
A: Technically they fit, but the “EE” revision has updated protection components. Using an “AA” might work temporarily, but you risk higher failure rates during voltage spikes. Stick to the latest revision if possible.Q: How do I know if my wiring is correct before powering up?
A: Perform a continuity check. Disconnect the field side, then measure resistance between the terminal and the corresponding ribbon cable pin using the schematic. It should be near 0Ω.Q: Does this board come with the ribbon cable?
A: No. This is a board-only sale. You must reuse your existing ribbon cable unless it shows physical damage or corrosion on the connectors.Q: What is the lead time for shipping?
A: We stock these units. If ordered before 2 PM EST, we ship same-day via FedEx Priority. International orders typically arrive in 3-5 days.Q: I’m worried about static damage during install. Any tips?
A: Absolutely valid concern. Always touch the bare metal cabinet frame before touching the board. Keep the board in its anti-static bag until the exact moment of installation.Q: Can I test this board on a bench without the full turbine system?
A: You can verify inputs by applying 24V DC and checking for continuity on the relay side. However, full logic verification requires the Mark V backplane and processor cards.
Quality Transparency Strategy (SOP)
1. Incoming Inspection
We trace the serial number to validate GE origin. Physical inspection focuses on the relay sockets—loose relays are a common failure point we re-solder. We check the conformal coating for yellowing or cracking, which indicates overheating history. All terminal blocks are inspected for stripped threads.2. Live Functional Testing
The board is mounted in our Mark V TMR test rack. We simulate all 24 input channels using a programmable DC source, stepping from 0V to 30V. We verify that the internal logic registers the state change within 10ms. Every relay output is cycled 50 times under a 2A resistive load to ensure contact cleanliness. A digital log of pass/fail per channel is created.3. Electrical Testing
We perform a dielectric strength test (Hi-Pot) at 1500V AC for 1 second between field terminals and logic grounds to ensure isolation integrity. Insulation resistance is measured at >20 MΩ @ 500V DC. Ground continuity from the mounting holes to the PCB ground plane is verified (<0.1 Ω).4. Firmware/Configuration Verification
Since this is a hardware I/O board, there is no flash firmware. Instead, we verify the hardware revision code printed on the silk screen matches the “EE” designation. We document the date codes of the installed relays and opto-isolators to ensure they are within manufacturing spec. Photos of the component side are archived.5. Final QC & Packaging
A senior technician signs the test report. The board is sealed in a moisture-barrier anti-static bag with a desiccant pack. We use heavy-duty bubble wrap and a double-walled carton. A “QC Passed” sticker with the test date and technician ID is placed on the box exterior. Function is verified under test conditions; site-specific wiring issues are outside our control.
Technical Pitfall Guide
- Ribbon Cable Orientation: The most frequent installation error. The red stripe on the ribbon cable must face Pin 1 (usually marked with a triangle or square on the connector). Reversing this can send 24V DC into the 5V logic bus, frying the main processor. Double-check before seating.
- Terminal Torque Issues: Over-tightening strips the plastic terminal block threads, leading to loose connections later. Under-tightening causes arcing. Use a calibrated torque screwdriver set to 0.5 Nm. You should feel a slight “click” or resistance stop.
- Common Ground Loops: If the field device ground and the cabinet ground are at different potentials, current will flow through the signal lines, causing false trips. Ensure a single-point ground strategy is used for the entire Mark V system.
- Relay Contact Rating: Do not exceed the 5A rating. We saw a case where a user switched a 10A solenoid directly. The contacts welded shut after two weeks, preventing a safety trip. Use an intermediate interposing relay for loads >4A.
- ESD Sensitivity: The input opto-isolators are sensitive to electrostatic discharge. Even if the board works initially, latent ESD damage can cause intermittent failures months later. Always wear a grounded wrist strap. One technician skipped this and took out three channels; the smell of ozone was the first clue.