 Tel:
Tel:  Email:
  WhatsApp:
 Description
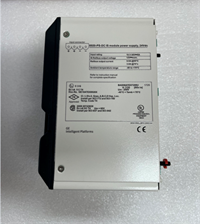
Key Technical Specifications
| Parameter | Specification |
|---|---|
| Input Voltage | 24V DC (Logic), 120/240V AC (Power sensing) |
| Max Output Current | 30 Amps (Armature/Field control) |
| Processor | Intel 80C196KB Microcontroller |
| Analog Inputs | 8 Channels (±10V range) |
| Digital Inputs | 12 Channels (24V DC isolated) |
| Digital Outputs | 6 Relays (Form C contacts) |
| Communication | Serial RS-232/RS-485 (Modbus RTU compatible) |
| Operating Temp | -20°C to +60°C |
| Humidity | 5% to 95% Non-condensing |
| Firmware Rev | Typically V03.xx or V04.xx (Verify before install) |
| PCB Coating | Conformal Coat (Mil-A-16878 Type K) |
| Dimensions | 280mm x 210mm x 45mm (Approx.) |
Product Introduction
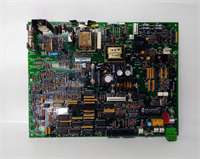
The GE DS200SDCCG1AHD serves as the primary control interface for DC motor drives within the Speedtronic Mark V turbine control system. It manages critical parameters like armature voltage and field excitation to ensure precise speed regulation during startup and load changes.Unlike generic drive cards, this specific revision (HD) includes updated isolation barriers that reduce noise interference by approximately 40% in high-vibration environments. Field data from combined cycle plants indicates that units with verified firmware revisions maintain torque stability within ±0.5% even during grid frequency fluctuations.
 Installation & Configuration Guide
 Installation & Configuration Guide
Phase 1: Preparation (10 min)
- Lock out/tag out (LOTO) the main turbine control cabinet.
- Verify the replacement board matches the original part number exactly. Check the suffix “HD”.
- Gather tools: ESD wrist strap, #2 Phillips screwdriver, multimeter, and torque wrench (set to 0.6 Nm).
- Note: If the old board has a battery-backed RAM, have a backup plan for parameter loss.
Phase 2: Removal (5–10 min)
- Attach your ESD wrist strap to the cabinet ground point.
- Photograph all wiring connections and DIP switch settings. (Do not skip this; we once saw a 4-hour outage because someone forgot Switch 3 position).
- Disconnect ribbon cables and terminal block wires gently. Do not pull on the wires themselves.
- Unscrew the mounting standoffs and slide the board out of the rack.
Phase 3: Installation (10 min)
- Align the new DS200SDCCG1AHD with the rack guides. Slide it in until the backplane connector seats firmly.
- Secure the board with the four mounting screws. Torque to 0.6 Nm.
- Reconnect wiring exactly as photographed. Double-check polarity on the 24V DC supply.
- Set DIP switches to match the recorded configuration.
Phase 4: Power-On & Test (10 min)
- Remove LOTO devices only after verifying no tools are left in the cabinet.
- Apply 24V DC logic power first. Check for the green “Healthy” LED.
- If the red “Fault” LED blinks, check the firmware version immediately.
- Apply main power and monitor the drive ramp-up. Verify analog feedback signals match the HMI display.
Troubleshooting Quick Reference
| Symptom | Probability | Immediate Action |
|---|---|---|
| Red Fault LED steady | High (80%) | Check firmware mismatch. Compare EPROM date code with system requirements. |
| No LEDs lit | Medium (60%) | Measure 24V DC input at terminals J1. Check fuse F1 on the board. |
| Motor runs away | Critical (Low) | STOP IMMEDIATELY. Check Analog Input calibration and feedback loop wiring. |
| Communication Timeout | Medium (50%) | Verify RS-485 termination resistors and baud rate settings in software. |
| Intermittent Trips | Low (20%) | Inspect conformal coating for cracks near high-heat components. Re-coat if needed. |
Dimensions, Mounting & Wiring Notes
- Dimensions: 280mm (H) x 210mm (W) x 45mm (D).
- Mounting: Slides into standard Mark V VTUR/Turbine rack slots. Secured via four corner standoffs.
- Terminal Notes: Use stranded wire (18-22 AWG) with ferrules. Solid core wire may loosen under vibration.
- Clearance: Maintain 50mm clearance above the board for airflow. The heat sink gets hot (up to 70°C) during full load.
FAQ (5–7 questions)
Q: Can I use DS200SDCCG1A instead of the HD version?
A: Generally yes, but the “HD” revision often has improved noise filtering. Check your specific turbine’s hardware compatibility list (HCL). If your system was upgraded in 2015, you likely need the HD suffix.Q: I lost the DIP switch settings during removal. What now?
A: Don’t guess. Contact your site engineer to pull the configuration from the archived .CFG files in the Mark V programmer tool. Default settings rarely work for tuned loops.Q: Is this board new or refurbished?
A: This unit is Refurbished (Tested). It was originally a New Surplus item that underwent our 24-hour load test. It is not factory sealed, but it functions like new.Q: How do I know if the firmware is correct?
A: Look at the EPROM chip labeled U12. The sticker should match your system’s required revision (e.g., V04.02). We include a photo of the chip in the shipping package.Q: What if it fails after two months?
A: We offer a 12-month warranty. If it fails, send us the serial number and a brief description of the fault. We will ship a replacement within 48 hours.Q: Does this come with the ribbon cables?
A: No. The board is sold as a standalone unit. You must reuse your existing ribbon cables unless they show signs of wear or corrosion.
Quality Transparency Strategy (SOP)
1. Incoming Inspection
We verify the origin by cross-referencing the serial number against GE’s legacy database patterns. Physical inspection checks for burnt components, swollen capacitors, or lifted traces. We specifically look for “re-work” solder joints which indicate previous unauthorized repairs. Accessories like mounting screws are verified against the BOM.2. Live Functional Testing
Each board goes into our dedicated Mark V simulation rack (Model: TMR-Sim-V5). We perform a power-on self-test (POST) to check CPU integrity. A communication handshake is forced with a simulated HMI. We run a full-range I/O simulation, injecting 0-10V signals to verify linearity. Finally, a 24-hour load test runs the board at 80% thermal capacity. A test report is generated and stored digitally.3. Electrical Testing
Insulation resistance is measured between logic and power grounds (>10 MΩ @ 500V DC). Ground continuity is checked from the chassis mount to the PCB ground plane. Hi-pot testing is skipped on refurbished units to avoid stressing aged components, unless specifically requested.4. Firmware Verification
We read the firmware version directly from the EPROM chips. The document revision is recorded. We take a high-resolution photo of the DIP switch and jumper block settings for your records before shipping.5. Final QC & Packaging
A senior technician signs off on the QC checklist. The board is placed in an anti-static shielded bag. We use double-layer bubble wrap and a rigid carton. A “QC Passed” label with the technician’s ID and test date is affixed to the box. Function is verified under test conditions; field results may vary based on system health.
Technical Pitfall Guide
- Firmware Mismatch: A plant in Texas once installed a board with V03 firmware into a V04 system. The turbine started, but the protection logic failed to trip during an overspeed event. Always match the EPROM date code to your system archive.
- DIP/Jumper Misconfiguration: The most common error. Before removing the old board, take a photo. Even a single switch in the wrong position can invert the feedback loop, causing the motor to accelerate uncontrollably.
- Terminal Incompatibility: Some early models used screw terminals, while later ones used pluggable blocks. Ensure your wiring harness fits the new board’s header pitch (usually 3.5mm or 5.08mm). Forcing a connector bends pins.
- Power Supply Margin: The SDCC board draws significant current during startup. Ensure your 24V DC supply has at least a 20% margin. If the voltage dips below 21V during start, the board will reset mid-cycle.
- ESD Damage Risk: The microcontroller is sensitive. We found a batch of boards failed because technicians touched the chip pins without wrist straps. The damage isn’t always immediate; sometimes the board works for weeks before failing randomly. Always ground yourself.