 Tel:
Tel:  Email:
  WhatsApp:
 Description
Key Technical Specifications
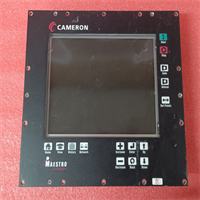
- Display Size: 10.4 inches diagonal
- Resolution: 640 x 480 pixels (VGA)
- Display Type: TFT Color LCD with LED Backlight
- Touch Technology: Analog Resistive (requires pressure, works with gloves)
- Processor: ARM9 based (Specific MHz varies by sub-revision)
- Memory: 128 MB RAM, 256 MB Flash (Typical for this generation)
- Power Supply: 24V DC (-15% / +20%)
- Power Consumption: Approx. 15W typical
- Communication Ports: 2x RS-232, 1x RS-485, 1x Ethernet (10/100 Mbps), USB Host (for data logging)
- Operating Temperature: 0°C to 50°C (32°F to 122°F)
- Protection Rating: Front bezel IP65 / NEMA 4X (when mounted correctly)
- Mounting: Panel mount with retaining clips (Cutout required: approx. 278 x 218 mm)
- Software: Eaton GALILEO Visualization & Configuration Software (Legacy versions required)
Product Introduction
If you’re still running an XV-440 in your plant, you likely have a line that was installed before the “Industry 4.0” buzzword existed, and frankly, it’s probably still running better than the new stuff. I’ve seen these XV400 panels stuck in corners of food processing plants covered in sugar dust and in automotive weld cells surrounded by magnetic noise. They aren’t pretty. The bezel is thick, the screen resolution looks low compared to your smartphone, and the resistive touch requires a firm poke. But they don’t crash when the voltage dips, and they don’t freeze up because a background update decided to run.The real value here is the native integration with Eaton PLCs (like the EC4P or SmartWire-DT systems). You don’t need complex gateway configurations; you just map the tags, and it works. The 10.4-inch size is the sweet spot for seeing trend graphs without needing a cabinet-mounted monitor. However, be warned: the backlight on these older TFTs has a finite life. If you see dimming or yellowing at the edges, the CCFL or early LED array is dying, and no amount of software tweaking will fix it. Also, the resistive screen gets annoying if your operators wear heavy, jagged gloves; it wears out the top layer faster than capacitive screens ever would.
 Quality SOP & Tech Pitfalls (The Reality Check)
 Quality SOP & Tech Pitfalls (The Reality Check)
The Lab Report (SOP)
We treat these legacy HMIs like fragile artifacts because replacement parts for the internal video boards are nonexistent.
- Visual Inspection: We check the LCD for “sunburn” (permanent image retention) and inspect the touchscreen overlay for scratches or delamination. We verify the NEMA gasket on the rear is intact; a missing gasket means it’s not IP65 anymore.
- Live Boot Test: We apply 24V DC and time the boot sequence. It should hit the main project screen within 45 seconds. Anything slower indicates failing flash memory.
- Touch Calibration Check: We run a diagnostic pattern to ensure all four corners register accurately. Drift in the corners is a common sign of aging resistive layers.
- Port Verification: Using a loopback tester, we verify RS-232 and Ethernet connectivity. We attempt to ping the unit and upload a small test project via GALILEO.
- Sealing: Units are wrapped in anti-static foam and boxed with corner protectors. The screen is protected with a rigid cardboard shield to prevent pressure cracks.
The Engineer’s Warning (Pitfalls)
The biggest headache with the XV-440 is the GALILEO software version mismatch. Eaton changed the kernel several times during the XV400 lifecycle. If you try to download a project created in GALILEO v2.5 to a panel running firmware v1.8, it will either reject the download outright or, worse, compile but crash randomly when hitting specific scripts.
Field Disaster: A packaging facility in Ohio replaced a cracked XV-440 with a “new surplus” unit we sold them. The maintenance guy didn’t check the firmware version. He downloaded his existing project, and the panel seemed fine. Two days later, during a high-speed changeover, the HMI froze on a “Recipe Load” screen. The line stopped for 4 hours. We remotely diagnosed it: the new panel had a slightly newer OS that handled memory allocation differently, causing a buffer overflow in an old, poorly written script. Always match the firmware version exactly, or be prepared to recompile and debug your entire visualization project.
Installation & Configuration Guide
Time estimate: 30 minutes for mechanical swap, plus software time.
- Pre-Installation Safety ⚠️
- Lockout/Tagout (LOTO) the main control panel. Even though the HMI is low voltage, you’re working near live terminals.
- CRITICAL: Take a photo of the DIP switches (if present on the com module) and the wiring terminal labels.
- Backup the current project file from the old panel if it still boots. Use “Upload Project” in GALILEO if possible.
- Removal
- Remove the protective cover (if installed).
- Unscrew the mounting clamps around the perimeter. There are usually 6 to 8 of them. Don’t lose them; they are proprietary sizes sometimes.
- Gently pull the unit forward. Support the weight; don’t let it hang by the cables.
- Disconnect the 24V DC power and communication cables. Label them immediately (e.g., “PLC Port 1”, “24V+”).
- Installation & Configuration
- Gasket Check: Ensure the new unit’s rear gasket is clean and seated. If reusing the old gasket, clean the groove thoroughly. A pinched gasket ruins your IP65 rating.
- Slide the unit into the cutout. Install the mounting clamps and tighten them evenly in a star pattern to avoid warping the frame.
- Reconnect wiring. Double-check polarity on the 24V DC input. Reversing power can blow the internal fuse or fry the input circuitry instantly.
- Connect the Ethernet/Serial cables to the correct ports (Port 1 is often default for PLC).
- Power-On & Testing
- Apply 24V DC power. Watch the LED indicator. It should turn green.
- Wait for the boot sequence. If it asks for “Calibration,” follow the on-screen dots.
- Connect your laptop to the Ethernet port. Ping the default IP (often 192.168.0.1 or similar, check manual).
- Download the project file. If the firmware versions differ, GALILEO will prompt for a conversion. Read the conversion log carefully for any “lost objects” or errors.
- Test all critical buttons and navigation paths. Verify alarm acknowledgment works.

Compatible Replacement Models
| Compatibility Tier | Model | Notes & Differences |
|---|---|---|
| ✅ Drop-in Replacement | XV-440-10TVB-1-10 (Same Model) | Exact fit. No code changes needed if firmware matches. Only viable option for zero-downtime swaps. |
| ⚠️ Software Compatible | XV-300 Series (e.g., XV-306-10) | Newer hardware, similar GALILEO software support. May require minor project adjustments for resolution differences or new drivers. Physical cutout size differs; requires panel modification. |
| ⚠️ Software Compatible | Eaton SmartWire-DT HMI | If your system uses SmartWire-DT, newer dedicated HMIs exist. Requires significant re-engineering of the communication layer. |
| ❌ Hardware Mod Required | Third-Party Universal HMI | Physically fits with adapter plate, but requires rewriting all logic and drivers from scratch. Not recommended for emergency repairs. |
Frequently Asked Questions (FAQ)
Q: Can I use a modern USB-to-Serial adapter to program this?
A: Yes, but be picky. The XV-440’s RS-232 stack is old and sensitive to timing. Cheap adapters with Prolific chips often fail or drop bytes during large project downloads. Stick to adapters with FTDI chips and set the latency timer to 1ms in the Device Manager.Q: The screen is dim, but the unit seems to work. Is it dead?
A: The backlight is failing. On these 10.4″ models, the backlight is often an integrated assembly. You can sometimes replace the inverter board or the lamp/LED strip if you are good with soldering irons and delicate ribbon cables, but it’s risky. Usually, it’s faster to swap the whole unit. Don’t run it too dim; operators will miss alarms.Q: Does this support Wi-Fi?
A: No. The XV-440 has Ethernet and Serial only. If you need wireless, you’ll need to add an external industrial wireless bridge to the Ethernet port. Don’t expect the panel to handle complex security handshakes; keep the network segment isolated.Q: I lost the password for the “Maintenance” level. Can you reset it?
A: The password is stored in the project file, not just the hardware. If you have the original .gal project file, you can remove the password in the software and re-download. If you don’t have the source file, you are stuck. Eaton does not have a “master backdoor” for security reasons. You might need to reverse-engineer the upload or contact the original machine builder.Q: Why does the touchscreen feel “sticky” or unresponsive in the corners?
A: Resistive screens degrade. The conductive layers separate or wear out. You can try recalibrating (usually holding two corners during boot), but if the physical layers are worn, calibration won’t fix it. Replace the unit. Cleaning with harsh solvents can also damage the top layer; use only mild soap and water.Q: Can I run multiple projects on one XV-440?
A: Technically, the flash memory can hold multiple projects, but the bootloader usually points to one active project. Switching between them isn’t a standard operator function and requires a service tool intervention. Treat it as a single-project device for production stability.