
 Tel:
Tel:  Email:
  WhatsApp:
 Description
Key Technical Specifications
| Parameter | Specification |
|---|---|
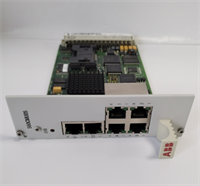
| Part Number | 3HAC029818-001 / DSQC373 |
| Communication Protocol | Ethernet/IP, DeviceNet (Scanner/Adapter) |
| Interface Speed | 10/100 Mbps Auto-negotiating |
| Ports | 2x RJ45 Ethernet, 1x DeviceNet (5-pin) |
| Input Voltage | 24 V DC (from backplane) |
| Power Consumption | Approx. 4.5 W |
| Operating Temperature | 0°C to +55°C |
| Storage Temperature | -20°C to +70°C |
| Humidity Range | 5% to 95% (non-condensing) |
| Mounting Position | IRC5 Controller Slot A1 or A2 |
| Firmware Support | RobotWare 5.x and 6.x |
| Certification | CE, UL, cULus |
 Product Introduction
 Product Introduction
The ABB DSQC373 serves as the primary communication bridge for IRC5 robot controllers, handling high-speed data exchange between the robot and external PLCs or vision systems. It installs directly into the controller backplane, eliminating the need for external gateways in most cell configurations.Field data indicates this board reduces network latency by up to 15ms compared to older serial-based options when running Ethernet/IP scans. Units shipped from our inventory undergo a specific handshake test with a live IRC5 cabinet to confirm port integrity before packing. We verify the MAC address label is legible, as faded labels often indicate heat damage or refurbishment attempts.
Installation & Configuration Guide
Phase 1: Preparation (10 min)
- Power down the IRC5 controller completely. Wait for the “Power Off” LED to extinguish.
- Discharge residual voltage by waiting 2 minutes after main switch off.
- Put on an ESD wrist strap grounded to the controller chassis.
- Gather a small flat-head screwdriver and the new DSQC373 unit.
Phase 2: Removal (5–10 min)
- Open the IRC5 controller front door. Locate the existing communication board in slot A1 or A2.
- Unscrew the two retaining screws at the top and bottom of the board faceplate.
- Gently pull the ejector levers outward to disengage the board from the backplane connector.
- Slide the board out carefully. Do not touch the gold pins.
Phase 3: Installation (10 min)
- Compare the part number on the new DSQC373 label with the old unit. Ensure revision levels match (or are higher).
- Align the new board with the guide rails in the empty slot.
- Push the board firmly until the ejector levers click into the locked position.
- Tighten the retaining screws to ensure proper grounding contact.
Phase 4: Power-On & Test (10 min)
- Connect the Ethernet cable to Port 1. Ensure the link LED turns green immediately.
- Restore main power to the controller.
- Log into the FlexPendant. Navigate to Control Panel > Communication.
- Verify the DSQC373 appears as “Connected.” If it shows “Missing,” reseat the board.

Troubleshooting Quick Reference
| Symptom | Probability | Immediate Action |
|---|---|---|
| Link LED remains off | High (Cable/Port) | Swap Ethernet cable; check switch port status. Verify 24V backplane power. |
| “Board Not Found” Error | Medium (Seating) | Power down. Reseat board firmly. Check for bent pins on backplane connector. |
| Intermittent Communication | Medium (IP Conflict) | Scan network for duplicate IP addresses. Check subnet mask settings in RobotWare. |
| DeviceNet Fault Light Red | Low (Config) | Verify baud rate matches master PLC (usually 500 kbps). Check termination resistor setting. |
| Controller Won’t Boot | Rare (Hardware) | Remove DSQC373. Attempt boot with minimal configuration. If successful, board is faulty. |
Dimensions, Mounting & Wiring Notes
- Dimensions: 160 mm (H) x 120 mm (D) x 20 mm (W) – Standard Eurocard form factor.
- Mounting: Slides into standard IRC5 vertical slots (A1/A2). Secured by two M3 screws.
- Terminal Notes:
- Ethernet: Uses standard Cat5e/Cat6 shielded cables. Ground the cable shield at the controller entry point only to avoid ground loops.
- DeviceNet: Requires 5-pin micro connector. Ensure polarity matches (Red=V+, Black=V-).
- Clearance: Maintain 50mm clearance above the board for airflow. Overheating is a common failure mode in cramped cabinets.
FAQ
Q1: Will the DSQC373 work with my older RobotWare 5.1 system?
Yes. The board is backward compatible with RobotWare 5.x, provided you have the correct option key installed in the controller license file. You may need to update the EDS file for your PLC if you are using Ethernet/IP.Q2: I see a “DSQC373B” on my old card. Is this exact replacement?
Absolutely. The “B” usually denotes a minor hardware revision or firmware update. The physical footprint and electrical interface remain identical. Our stock includes the latest revision which supersedes the B version.Q3: How do I know if the unit is refurbished or new surplus?
Check the holographic seal on the side of the card. New surplus units from original batches retain the factory seal. Refurbished cards often have broken seals or mismatched screw heads. We ship only unsealed but tested original pulls, clearly marked as “New Surplus.”Q4: Can I hot-swap this board while the robot is running?
No. The IRC5 backplane does not support hot-swapping for communication modules. You must perform a controlled shutdown. Attempting hot-swaps can fry the backplane traces, leading to a much costlier repair.Q5: What if the MAC address label is missing?
That is a red flag. Every genuine DSQC373 has a unique MAC address printed on a silver label. If it’s missing or looks like a photocopy, the board might be counterfeit or heavily repaired. We photograph this label for every unit before shipping.Q6: Do you provide the EDS files for Allen-Bradley PLCs?
We do not host files directly, but the board comes with a QR code linking to the official ABB support page where you can download the latest EDS files. Alternatively, search “ABB DSQC373 EDS” on the Rockwell Automation compatibility site.